
There’s nothing quite like the smell of fresh Homemade Cinnamon Rolls baking in the oven on a lazy weekend morning. I remember the first time I attempted to make them from scratch—it was a bit intimidating, but the gooey, cinnamon-swirled results were worth every second. If you’ve ever wondered how to recreate that bakery-fresh magic at home, you’re in the right place. These Homemade Cinnamon Rolls are soft, pillowy, and topped with a creamy icing that melts in your mouth.
In my experience, nothing beats the satisfaction of pulling warm Homemade Cinnamon Rolls from the oven and watching your family’s faces light up. Whether you’re a baking novice or a seasoned pro, this recipe simplifies the process without skimping on flavor. Let’s dive into how you can make your own batch today—trust me, once you try these, store-bought will never compare.
I’ve perfected this recipe over years of trial and error, and I’m excited to share it with you. Imagine biting into a roll that’s not too sweet, with just the right amount of spice and that irresistible doughy center. Get ready to impress everyone with your Homemade Cinnamon Rolls!
Grab This Chef Knife Now - Almost Gone!

- Stays Razor-Sharp: Ice-hardened blade keeps its edge longer than ordinary knives
- Superior Grip Control: Unique finger hole design gives you perfect balance and safety
- Built to Last a Lifetime: Premium stainless steel blade with elegant beech wood handle
- ✓ Finally, a knife that stays sharp and feels comfortable in my hand
- ✓ Professional quality without the premium price tag
- ✓ Makes meal prep faster and more enjoyable
⏰ Only a few items left in stock - order soon
Key Takeaways:
- Homemade Cinnamon Rolls offer a fresh, customizable alternative to store-bought versions, with endless opportunities for personalization.
- This recipe cuts down prep time to under 30 minutes, making it ideal for busy mornings or last-minute brunches.
- The combination of warm cinnamon filling and smooth cream cheese icing delivers an unbeatable, comforting flavor profile.
- For the fluffiest results, allow the dough to rise undisturbed in a warm spot—patience pays off here.
- Store extras in an airtight container for up to three days; they reheat beautifully for a quick treat anytime.
Why You’ll Adore This Homemade Cinnamon Rolls
Irresistible Freshness: Nothing compares to the aroma of Homemade Cinnamon Rolls wafting through your kitchen—it’s like a warm hug on a chilly day. These rolls come out soft and tender every time, far superior to anything from a can. You’ll find yourself making excuses just to bake them again.
Family Favorite Vibes: In my house, these Homemade Cinnamon Rolls are a hit with kids and adults alike; we’ve turned Sunday mornings into a ritual around them. The process is therapeutic, and sharing the results creates lasting memories. It’s the kind of recipe that brings everyone together.
Versatile Indulgence: Whether for breakfast, dessert, or a cozy snack, Homemade Cinnamon Rolls fit any occasion perfectly. They’re not overly complicated, yet they feel luxurious. What I love most is how they adapt to whatever mood you’re in.
Healthier Twist Possible: You can tweak these Homemade Cinnamon Rolls with whole wheat flour or less sugar for a guilt-free version that still tastes amazing. I’ve experimented plenty, and they always turn out deliciously satisfying. It’s empowering to control the ingredients yourself.
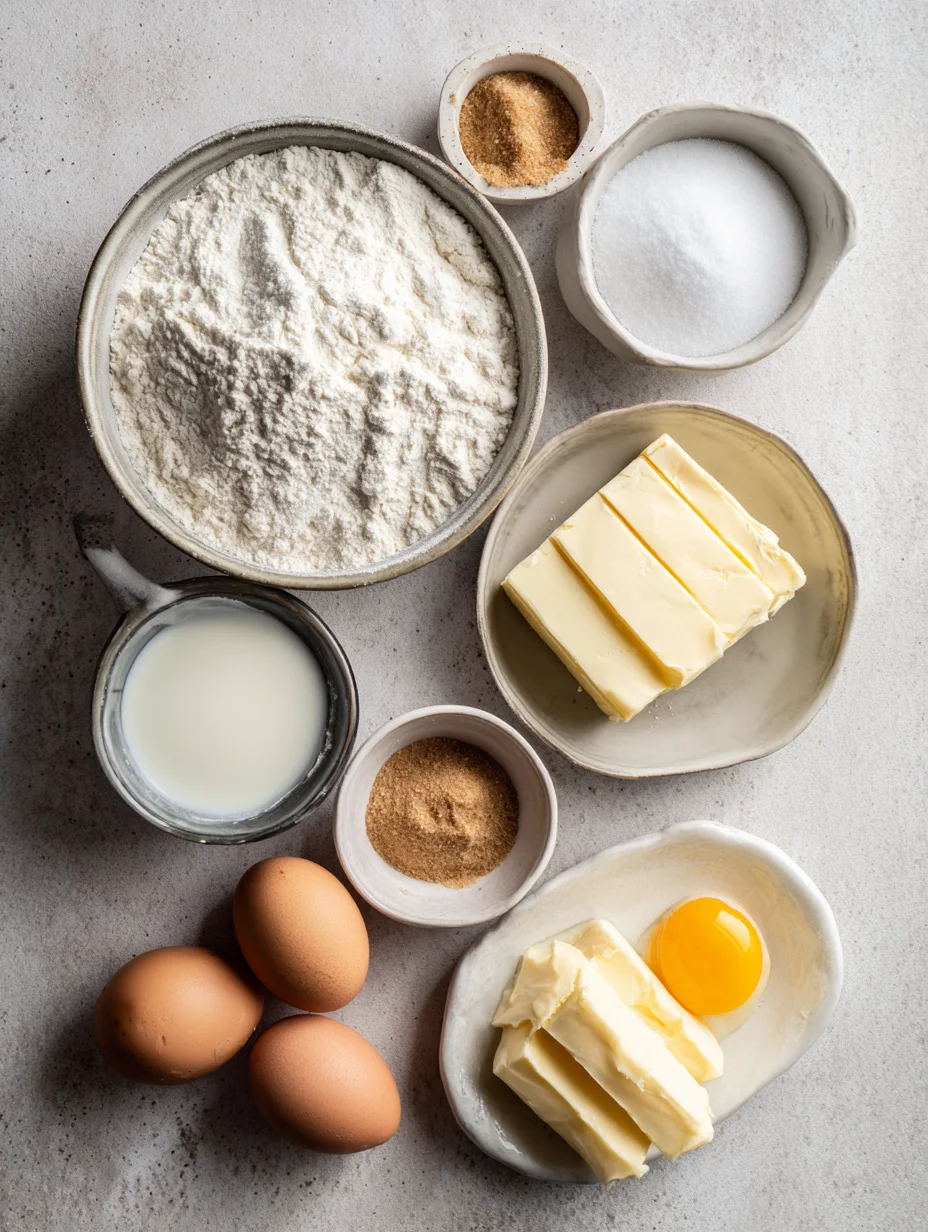
Essential Ingredients for Homemade Cinnamon Rolls
Active Dry Yeast: This is the powerhouse that makes your dough rise to fluffy perfection in Homemade Cinnamon Rolls. Without it, you’d miss that light, airy texture we all crave. I always proof it in warm milk first to ensure it’s alive and kicking—it’s a simple step that guarantees success every time. In fact, using fresh yeast can elevate your rolls from good to bakery-worthy.
Ground Cinnamon: The star spice in any Homemade Cinnamon Rolls recipe, it infuses the filling with that signature warm, comforting flavor. Combined with brown sugar and butter, it creates a gooey swirl that’s pure heaven. I’ve found that high-quality cinnamon makes a noticeable difference in intensity—don’t skimp here if you want bold taste.
All-Purpose Flour: The backbone of the dough, this ingredient provides the structure for soft, chewy Homemade Cinnamon Rolls. It absorbs the liquids just right, yielding a roll that’s neither tough nor crumbly. Measure it by spooning into the cup rather than scooping to avoid dense results; trust me, it’s a game-changer from my baking mishaps.
Cream Cheese: For the icing, this adds a tangy richness that balances the sweetness in Homemade Cinnamon Rolls beautifully. It melts smoothly, creating a velvety topping that seeps into every bite. I prefer full-fat for the creamiest texture, but light versions work in a pinch without much sacrifice.
How to Make Homemade Cinnamon Rolls
Prepare the Dough
Start by warming your milk and dissolving the yeast in it—this activates the magic for your Homemade Cinnamon Rolls. Stir in sugar, butter, eggs, and flour gradually until a soft dough forms; it should be slightly sticky but manageable. Knead on a floured surface for about 5-8 minutes until smooth and elastic; in my experience, this step builds the gluten for that perfect chew. Let it rise in a covered bowl in a warm spot for an hour—it’ll double in size, filling your kitchen with a yeasty promise of what’s to come.
Make and Spread the Filling
Once risen, roll out the dough into a large rectangle, about 1/4-inch thick, for even Homemade Cinnamon Rolls. Mix softened butter with brown sugar and cinnamon to form a paste, then spread it generously over the dough—don’t hold back, as this is where the flavor lives. Roll it up tightly from the long side, like a jelly roll, and slice into 12 even pieces; use a sharp knife or floss for clean cuts that keep the swirls intact. Place them swirl-side up in a greased baking dish, and give them another 30-minute rise to puff up nicely.
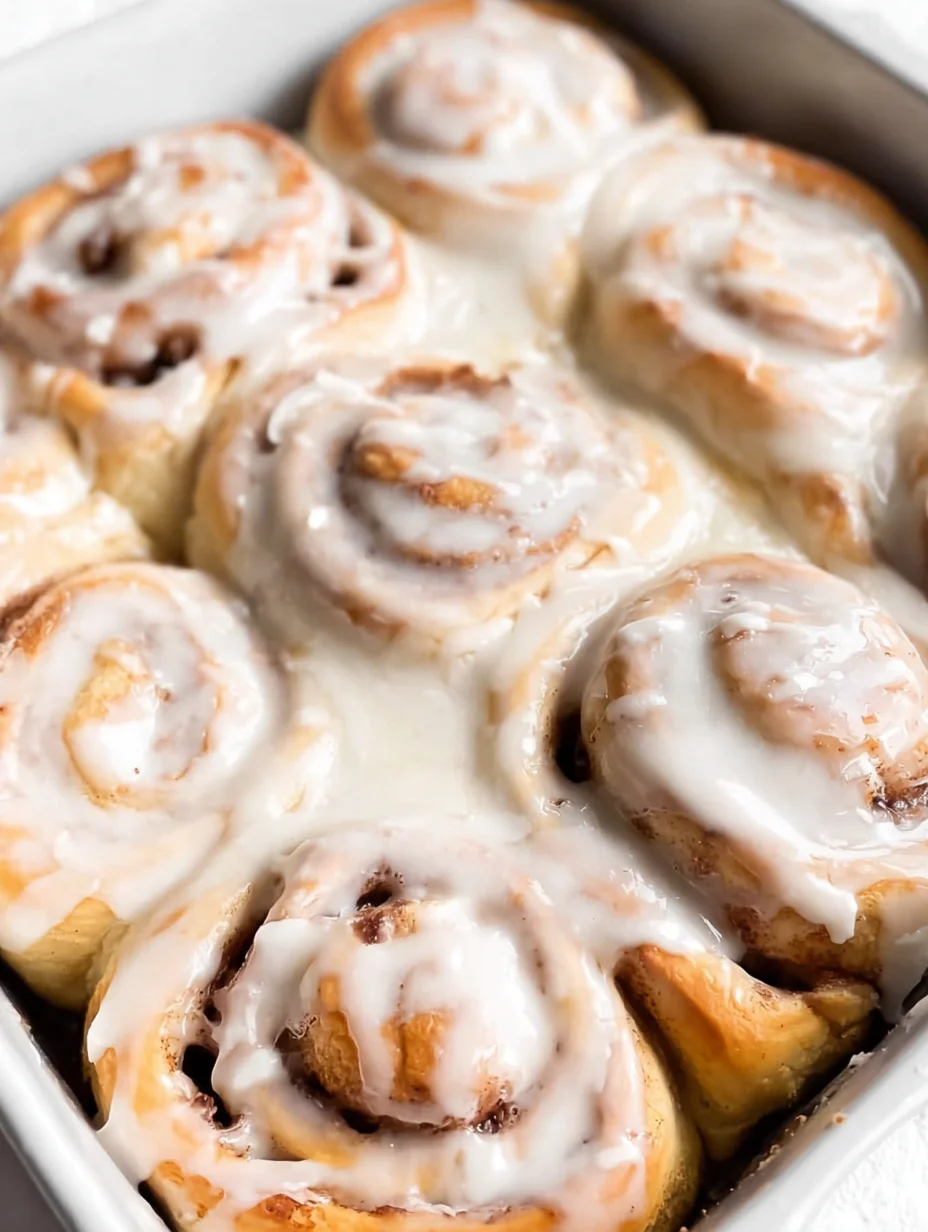
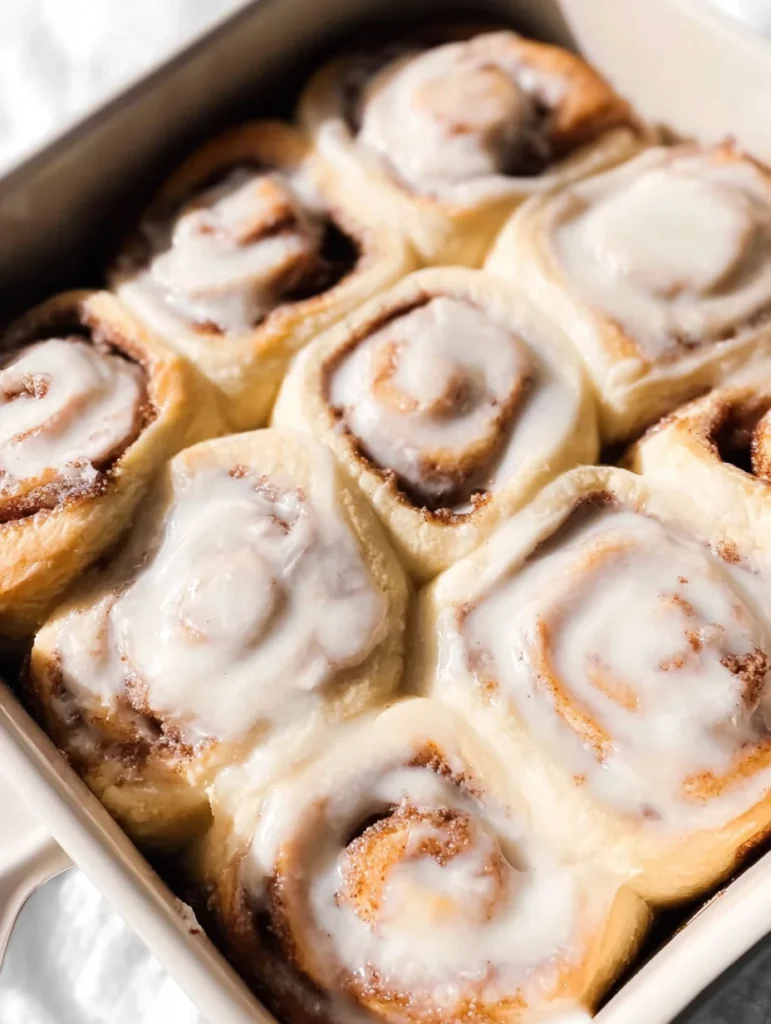
Bake and Ice
Bake your Homemade Cinnamon Rolls at 350°F for 20-25 minutes until golden brown on top; watch closely to avoid overbaking, as they continue cooking from residual heat. While they cool slightly, whip up the icing by beating cream cheese, butter, powdered sugar, and vanilla until smooth and spreadable. Drizzle or slather it on warm rolls so it melts into every crevice—it’s messy, but oh so worth it. Let them rest a few minutes before serving for the best gooey texture.
Ingredients
For the Dough:
- 1 cup warm milk (110°F)
- 2 1/4 teaspoons active dry yeast (1 packet)
- 1/2 cup granulated sugar
- 1/3 cup unsalted butter, melted
- 1 large egg
- 1 teaspoon salt
- 4 cups all-purpose flour
For the Filling:
- 1/2 cup unsalted butter, softened
- 1 cup brown sugar, packed
- 2 1/2 tablespoons ground cinnamon
For the Cream Cheese Icing:
- 8 oz cream cheese, softened
- 1/4 cup unsalted butter, softened
- 2 cups powdered sugar
- 1 teaspoon vanilla extract
Homemade Cinnamon Rolls Instructions
- Warm the milk in a small saucepan or microwave until it reaches 110°F. Stir in the yeast and let it sit for 5-10 minutes until foamy.
- In a large bowl, mix the foamy yeast mixture with sugar, melted butter, egg, and salt. Gradually add flour, one cup at a time, stirring until a dough forms.
- Turn the dough onto a floured surface and knead for 5-8 minutes until smooth. Place in a greased bowl, cover, and let rise in a warm place for 1 hour.
- While rising, prepare the filling by mixing softened butter, brown sugar, and cinnamon into a spreadable paste.
- Punch down the risen dough and roll out into a 16×21-inch rectangle. Spread the filling evenly over the dough, leaving a small border.
- Roll the dough tightly from the long side into a log. Cut into 12 equal slices and place in a greased 9×13-inch baking dish.
- Cover and let rise for 30 minutes. Preheat oven to 350°F.
- Bake for 20-25 minutes or until golden. Cool slightly.
- For icing, beat cream cheese and butter until smooth. Add powdered sugar and vanilla; mix until creamy.
- Spread icing over warm rolls and serve immediately.
Pro Tips for the Best Homemade Cinnamon Rolls
Yeast Check: Always test your yeast by proofing it first—bubbly means it’s good to go for flawless rises in your Homemade Cinnamon Rolls.
Grab This Kitchen Scale Now — Best Precision Pick!

- Razor-Accurate Every Time: Dual-increment precision down to 0.1g — perfect for baking, meal prep, and portion control with g, oz, ml, and fl'oz modes.
- Smart Removable Bowl Design: Detachable bowl doubles as a protective case for compact storage. Tare function lets you weigh ingredients in any container with zero fuss.
- Built for Everyday Convenience: Auto-zero, tare function, low battery alert, overload indicator, and 2-minute auto-off to extend battery life — all in a sleek stainless steel build.
- ✓ "Perfect for baking — precise, lightweight, and stores easily without wasting counter space"
- ✓ "A game changer! Weighing ingredients is now way more accurate than measuring cups"
- ✓ "Love the 0.1g precision and backlight — best food scale I've owned. Highly recommend!"
⏰ Only a few items left in stock - order soon
Flour Measurement: Spoon flour into your measuring cup and level with a knife; packing it in leads to dense dough that ruins the texture.
Warm Spot Rising: If your kitchen is chilly, place the covered dough near a warm oven or use a damp towel for optimal puffiness.
You Must Know
- Homemade Cinnamon Rolls are best enjoyed fresh, but they freeze well unbaked for make-ahead convenience.
- The key to soft rolls is not over-kneading the dough—stop when it’s smooth to avoid toughness.
- Cinnamon quality matters; fresh ground spice intensifies the filling’s warmth and aroma.
- Room temperature ingredients mix better, ensuring even distribution in your Homemade Cinnamon Rolls batter.
How to Store Homemade Cinnamon Rolls
To keep your Homemade Cinnamon Rolls fresh, store them in an airtight container at room temperature for up to two days. For longer storage, refrigerate them for up to a week, though they might firm up slightly—reheat in the microwave for 15-20 seconds to restore that soft gooeyness. Freezing is also great; wrap individually and thaw overnight before enjoying. Always avoid direct air exposure to prevent drying out these delightful treats.
Customizing Your Homemade Cinnamon Rolls
You can easily swap in whole wheat flour for half the all-purpose to make a heartier version of Homemade Cinnamon Rolls without losing much softness. For a fruity twist, add chopped pecans or raisins to the filling, or try pumpkin spice instead of plain cinnamon in fall. If you’re watching sugar, reduce the brown sugar by a quarter and boost the cinnamon for bolder flavor. Check out our easy one-hour cinnamon rolls recipe for a quicker variation that still delivers on taste.
What to Serve with Homemade Cinnamon Rolls
Pair your Homemade Cinnamon Rolls with a hot cup of coffee or tea for the ultimate breakfast indulgence—the bitterness cuts through the sweetness perfectly. For a savory balance, serve alongside scrambled eggs or bacon from our breakfast sausage casserole recipe. If you’re going brunch-style, add fresh fruit like berries or a simple yogurt parfait. In cooler weather, warm apple cider complements the cinnamon notes beautifully.
BEST Homemade Cinnamon Rolls
These are the absolute BEST cinnamon rolls ever!! With a pillowy soft homemade dough, sweet cinnamon filling, and ooey gooey cream cheese frosting, there's no better treat!
Timing
Recipe Details
Ingredients
- 01 4-5 cups (520g-650g) all-purpose flour, spooned and leveled
- 02 1/4 cup (50g) granulated sugar
- 03 2 1/4 teaspoons (1 package) instant yeast
- 04 1/2 teaspoon salt
- 05 3/4 cup (180mL) water (*)
- 06 1/2 cup (120mL) whole milk
- 07 1/4 cup (60g) unsalted butter, cut into 4 slices
- 08 1 large egg, at room temperature
- 09 6 tablespoons (85g) unsalted butter, very soft
- 10 3/4 cup (150g) packed brown sugar, light or dark
- 11 1 1/2 tablespoons ground cinnamon
- 12 4 oz (115g) full fat block cream cheese, room temperature
- 13 5 tablespoons (70g) unsalted butter, room temperature
- 14 1 1/2 cups (195g) powdered sugar
- 15 1 teaspoon pure vanilla extract
Instructions
In a large bowl, combine 3 cups of flour (to start), sugar, yeast, and salt. Whisk to combine and set aside.
In a medium microwave safe bowl or cup, combine water, milk, and sliced butter. Microwave in 10 second bursts until the butter just melts and the mixture feels warm but not hot. You can also do this with a pot placed on a stove burner set to low heat.
Whisk the egg into the water mixture to combine.
Pour the wet ingredients over the flour mixture. Using a wooden spoon, mix together until you have a very thick and sticky dough.
Add another 1 cup of flour to the dough and mix until it starts coming together into ball.
This next step can be done directly in your bowl or on a lightly floured work surface. Knead the dough, adding flour as needed to keep it from sticking to your hands / the sides of the bowl, until it's smooth, elastic, and slightly tacky. If you poke the top of the dough, it should spring back - if the indent remains, the dough needs more kneading.
Cover the dough and set aside for about 20 minutes. The dough will puff up slightly but won't double in size. This is just to relax the gluten and make the dough easier to roll without it pulling in on itself.
Turn the rested dough onto a lightly floured work surface and roll it out into a roughly 14x10 inch rectangle. Use your hands to press and pull the edges to get as nice of a rectangular shape as you can - it doesn't have to be perfect though!
Spread the softened butter over the dough, leaving a roughly 1/2 inch boarder along the edges. Sprinkle the sugar on top and use your hands to spread it out into an even layer over the butter. Finally, sprinkle the cinnamon evenly on top.
Working from the longer side of the dough, roll it up into a log.
Cut about 1/2 an inch off each end of the log (this just makes for nicer and more uniform rolls - you can bake them off separately or just skip this step if you don't mind the appearance).
Use a sharp serrated knife or unflavored dental floss to cut the log into 12 even rolls. If using a knife, cut the rolls using a sawing motion to prevent squishing. If using floss, break off a large string of unflavored dental floss and wiggle it under your log of dough positioned where you'd like to cut. Lift the ends of the floss up and over the log and cross to form an X. Pull on the ends of the floss to cut through the dough (see above post for visual).
Arrange the rolls cut side up in a 9x13 inch baking dish. There should be a tiny bit of space between each roll but it's fine if they're touching.
Cover the rolls and set aside in a warm place for about 45 minutes or until about doubled in size. My favorite place to keep cinnamon rolls during this time is in the oven (it shouldn't be on or hot) just because it keeps the rolls safe from any cold drafts. They'll be pressed up against each other once they puff up - that's normal!
Uncover the rolls and place into the center of your preheated oven. Bake for 25 to 30 minutes or until a nice golden brown on top. Set aside while you make the icing.
In a medium sized bowl, combine icing ingredients. Using an electric mixer fitted with the paddle attachment or a wooden spoon by hand, cream together until smooth. If using a mixer, start on low speed just to incorporate everything together and then whip on medium speed to smoothen the mixture out.
While the cinnamon rolls are still warm, spread the icing on top. It'll melt slightly and make them extra gooey!
FILED UNDER:
NUTRITION FACTS (PER SERVING)
Nutrition information is calculated using an ingredient database and should be considered an estimate. In cases where multiple ingredient alternatives are given, the first listed is calculated for nutrition. Garnishes and optional ingredients are not included.
Frequently Asked Questions About Homemade Cinnamon Rolls
Can I make Homemade Cinnamon Rolls ahead of time?
Absolutely, prepare the rolls up to the second rise and refrigerate overnight; let them come to room temperature before baking. This method saves morning hassle while ensuring fresh-baked results. I’ve done this for holidays, and it works like a charm every time.
How long does Homemade Cinnamon Rolls last in the fridge?
They’ll stay fresh in the fridge for up to five days when stored airtight. Reheat gently to revive the moisture and flavor. Beyond that, freeze them to extend enjoyment.
Can I use instant yeast for Homemade Cinnamon Rolls?
Yes, instant yeast works great—just add it directly to the flour without proofing, and reduce the liquid slightly if needed. It speeds things up for quicker prep. The results are just as fluffy and delicious.
What if my Homemade Cinnamon Rolls don’t rise properly?
Check your yeast freshness first; expired yeast won’t activate. Ensure your environment is warm—aim for 75-85°F. Patience helps too; sometimes they just need extra time in your Homemade Cinnamon Rolls process.
Are Homemade Cinnamon Rolls gluten-free possible?
You can adapt using a 1:1 gluten-free flour blend, but add xanthan gum if not included for better binding. They won’t be identical, but still tasty. Test a small batch first for best results.
How do I avoid soggy Homemade Cinnamon Rolls?
Bake until the centers are set, not just golden on top, to evaporate excess moisture. Let them cool slightly before icing to prevent melting too fast. Proper storage in a breathable cover helps maintain that perfect texture in your Homemade Cinnamon Rolls.
Can I make vegan Homemade Cinnamon Rolls?
Sure, substitute plant-based milk, vegan butter, and a flax egg for the regular ones. The flavor remains incredible with these swaps. It’s a crowd-pleaser for all diets.
Why are my Homemade Cinnamon Rolls tough?
Often, it’s from over-kneading or too much flour—measure precisely and knead just until smooth. Under-proofing the dough can also cause density. Adjust next time for softer, pillowy Homemade Cinnamon Rolls.
Final Thoughts
These Homemade Cinnamon Rolls have become a staple in my kitchen, bringing joy and warmth to every gathering. From the first rise to that final icing drizzle, the process is as rewarding as the eating. I encourage you to roll up your sleeves and give this recipe a try—you won’t regret it. Share your creations and tag us; we’d love to see your Homemade Cinnamon Rolls in action!