

There’s nothing quite like the aroma of a baking pie wafting through your home, especially when it’s a homemade Best Apple Pie. Growing up, my grandma’s apple pie was the stuff of legends – a perfect balance of sweet and tart, with a flaky, buttery crust that just melted in your mouth. I spent years trying to replicate that magic, and I think I’ve finally cracked the code to what I truly believe is the Best Apple Pie you’ll ever make. It’s a dessert that brings smiles, comfort, and an undeniable sense of home to any gathering. What I find interesting is how a few simple ingredients can create such an iconic and beloved treat.
Maybe you’re searching for that perfect holiday dessert, or perhaps you just want to master a classic. Well, you’ve come to the right place! This recipe isn’t just about ingredients and steps; it’s about creating an experience, a memory that will linger long after the last slice is gone. We’re going to walk through each step to ensure your homemade Best Apple Pie is nothing short of spectacular. This isn’t just a recipe; it’s an invitation to create something truly special, a moist banana bread for pie lovers.
So, get ready to roll up your sleeves, because today we’re diving into the absolute best way to prepare this iconic dessert. Trust me on this one – once you try this recipe, you’ll agree it’s the Best Apple Pie, hands down.
Grab This Chef Knife Now - Almost Gone!

- Stays Razor-Sharp: Ice-hardened blade keeps its edge longer than ordinary knives
- Superior Grip Control: Unique finger hole design gives you perfect balance and safety
- Built to Last a Lifetime: Premium stainless steel blade with elegant beech wood handle
- ✓ Finally, a knife that stays sharp and feels comfortable in my hand
- ✓ Professional quality without the premium price tag
- ✓ Makes meal prep faster and more enjoyable
⏰ Only a few items left in stock - order soon
Key Takeaways:
- Achieve the quintessential flaky, buttery crust for your Best Apple Pie with specific chilling techniques.
- Discover the ideal blend of apples and spices for a perfectly balanced and flavorful filling every time.
- Learn simple tips to prevent a soggy bottom, ensuring your Best Apple Pie is structurally sound and delicious.
- Master the lattice top technique to elevate the presentation of your homemade Best Apple Pie.
- Understand the best practices for cooling and serving your Best Apple Pie for optimal enjoyment.
Why You’ll Adore This Best Apple Pie
Unforgettable Flavor Combination: This Best Apple Pie balances the sweetness of ripe apples with a hint of tartness, all enveloped in warm, comforting spices. It’s a symphony for your taste buds.
Perfectly Flaky Crust Every Time: We’ll delve into the secrets behind achieving a beautifully golden, incredibly flaky crust that is truly the hallmark of a fantastic apple pie. No more tough or dry crusts, I promise!
A Crowd-Pleasing Dessert for Any Occasion: Whether it’s a family dinner, a holiday gathering, or just a cozy night in, this Best Apple Pie is always a hit. It’s timeless, comforting, and universally adored, making it the perfect choice for celebrating.
Surprisingly Easy to Master: Don’t let pie-making intimidate you. With my detailed instructions and helpful tips, you’ll find that making this Best Apple Pie from scratch is not only achievable but truly enjoyable. You might even find yourself preferring it to whipping up fudgy browkies.
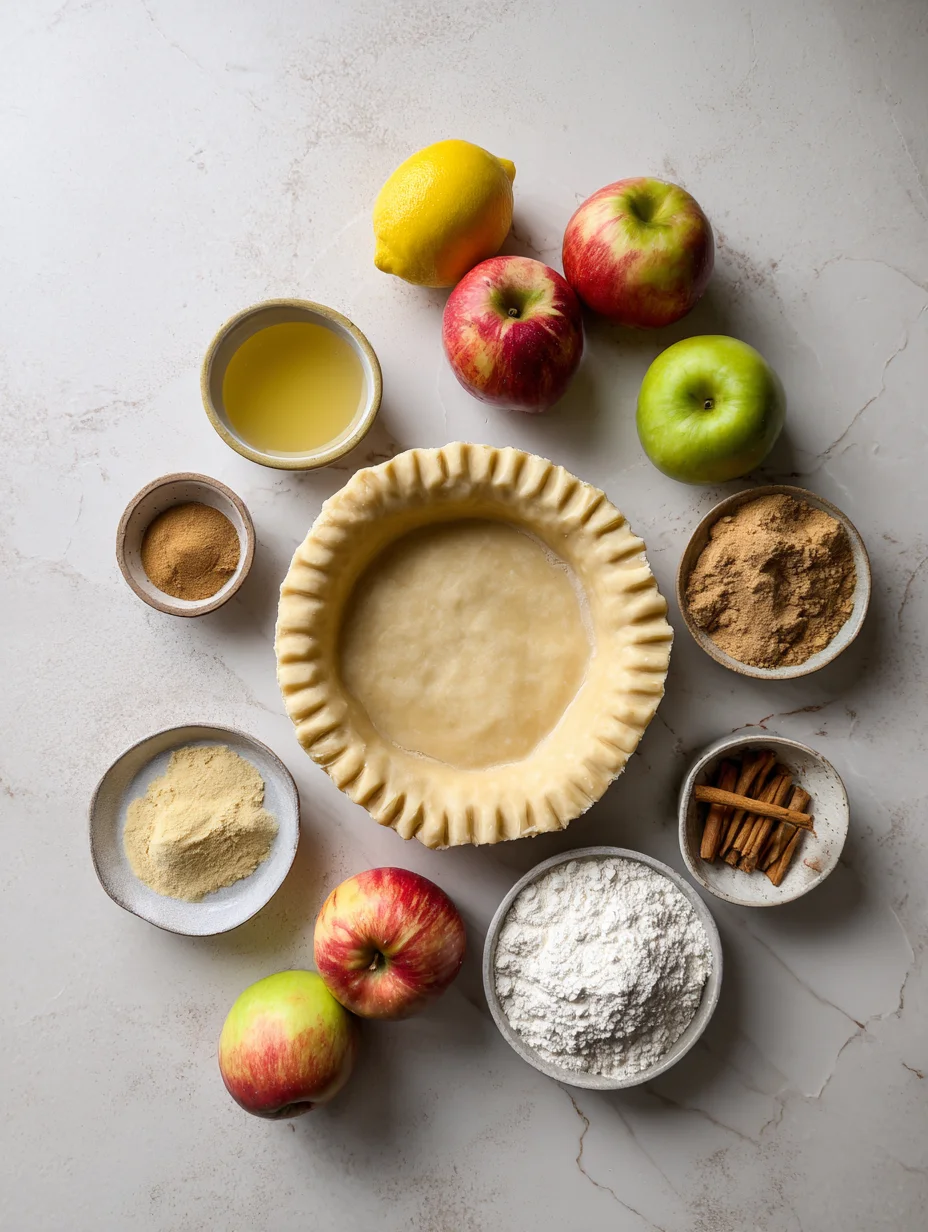
Essential Ingredients for Best Apple Pie
Apples (Granny Smith & Honeycrisp): The secret to the Best Apple Pie is using a blend of apples. Granny Smiths provide that essential tartness and hold their shape beautifully, while Honeycrisps bring sweetness and a lovely texture. This combination prevents the filling from becoming overly mushy or too sweet, giving you that perfect balance.
All-Purpose Flour (for crust): For the crust, using good quality all-purpose flour is key. It creates the structure for that enviable flaky texture. Remember, don’t overwork the dough; that’s where the flakiness truly comes alive.
Unsalted Butter (cold for crust): Cold butter is non-negotiable for a truly flaky pie crust, especially for the Best Apple Pie. The small pockets of butter melt during baking, creating steam that separates the layers of dough, resulting in that delightful airy crunch. It’s what gives “Best Apple Pie” its reputation.
How to Make Best Apple Pie
Crafting the Perfect Pie Crust
Let’s start with the foundation of any truly great pie: the crust. For this Best Apple Pie, we’re aiming for flaky, buttery perfection. Begin by combining your cold flour and salt in a large bowl. Then, cut in very cold, cubed unsalted butter. You want to work quickly, using your fingers or a pastry blender, until the mixture resembles coarse crumbs with some pea-sized pieces of butter still visible. This is crucial for that ethereal flakiness. Gradually add ice water, one tablespoon at a time, mixing until the dough just comes together. Don’t overmix! Divide the dough in half, flatten into discs, wrap, and chill for at least 30 minutes. This chilling time is vital for the structure of the Best Apple Pie crust.
Preparing the Irresistible Apple Filling
While your dough chills, it’s time to prepare our delicious apple filling for the Best Apple Pie. Peel, core, and slice your Granny Smith and Honeycrisp apples into uniform pieces, about 1/4 inch thick. In a large bowl, toss the apples with granulated sugar, brown sugar, cinnamon, nutmeg, a pinch of cloves, and a tablespoon of lemon juice. The lemon juice not only brightens the flavor but also prevents the apples from browning. Stir in a touch of cornstarch or flour; this will help thicken the juices during baking, ensuring your Best Apple Pie has a beautiful, not-too-runny filling. Let this mixture sit for a few minutes to allow the flavors to meld.
Assembling and Baking Your Masterpiece
Preheat your oven and prepare your pie dish. On a lightly floured surface, roll out one disc of chilled dough into a 12-inch circle. Carefully transfer it to your pie dish. Trim the edges, leaving about a 1/2-inch overhang. Pour your apple filling into the crust, mounding it slightly in the center. Dot the top of the filling with a few small pieces of butter for added richness. For the top crust, you can either roll out the second disc and place it over the filling, cutting slits for steam, or create a beautiful lattice top, which I find adds an extra touch of elegance to any Best Apple Pie. Crimp the edges to seal. Brush the top with an egg wash and sprinkle with a little sugar for a golden, sparkling finish. Bake until golden brown and bubbly, then let your culinary creation cool completely before slicing – this allows the filling to set properly, ensuring every slice of this Best Apple Pie is perfect.
Ingredients
Best Apple Pie Instructions
Pro Tips for the Best Best Apple Pie
Chill Your Butter and Dough Faithfully: Seriously, cold butter is your best friend for a flaky crust. Don’t skip the chilling steps for the dough, either.
Don’t Overwork the Dough: Mix just until the dough comes together. Over-handling develops the gluten, making your crust tough instead of tender.
Grab This Kitchen Scale Now — Best Precision Pick!

- Razor-Accurate Every Time: Dual-increment precision down to 0.1g — perfect for baking, meal prep, and portion control with g, oz, ml, and fl'oz modes.
- Smart Removable Bowl Design: Detachable bowl doubles as a protective case for compact storage. Tare function lets you weigh ingredients in any container with zero fuss.
- Built for Everyday Convenience: Auto-zero, tare function, low battery alert, overload indicator, and 2-minute auto-off to extend battery life — all in a sleek stainless steel build.
- ✓ "Perfect for baking — precise, lightweight, and stores easily without wasting counter space"
- ✓ "A game changer! Weighing ingredients is now way more accurate than measuring cups"
- ✓ "Love the 0.1g precision and backlight — best food scale I've owned. Highly recommend!"
⏰ Only a few items left in stock - order soon
Use an Apple Blend for Best Flavor: A mix of tart (Granny Smith) and sweet (Honeycrisp) apples gives the most complex and balanced flavor profile for your Best Apple Pie.
You Must Know
- The type of apples you use significantly impacts the final texture and flavor of your Best Apple Pie.
- Properly chilling your pie dough is the single most important step for achieving a flaky crust.
- Baking at a higher temperature initially helps set the crust and prevents a soggy bottom.
- Allowing your pie to cool completely is crucial for the filling to set, making for perfect slices.
How to Store Best Apple Pie
Once your Best Apple Pie has cooled completely, you can store it at room temperature for up to two days, loosely covered with plastic wrap or aluminum foil. For longer storage, refrigerate the pie. It will stay fresh in the fridge for up to 4-5 days. To reheat, you can warm individual slices in the microwave or place the entire pie in a 300°F (150°C) oven for about 15-20 minutes, or until warmed through. This will help crisp up the crust of your Best Apple Pie again.
Customizing Your Best Apple Pie
Feeling adventurous with your Best Apple Pie? You can totally play around with the spices! Try adding a pinch of allspice or ginger for an extra layer of warmth. For a slightly different crust, you could incorporate a tablespoon of finely chopped pecans into the dough for a nutty flavor – similar to how you might add different mix-ins to snickerdoodle cookies. Another fantastic addition is a tablespoon of bourbon or calvados to the apple filling for a sophisticated twist; it deepens the flavor wonderfully. If you prefer a truly open-faced pie, consider a streusel topping instead of a full top crust, adding a delightful crumbly texture to your Best Apple Pie.
What to Serve with Best Apple Pie
The classic pairing for Best Apple Pie is, of course, a generous scoop of vanilla bean ice cream. The cold, creamy ice cream perfectly contrasts with the warm, spiced pie. Another wonderful accompaniment is a dollop of fresh, lightly sweetened whipped cream, which adds a delicate richness. If you’re looking for something a bit more, a slice of sharp cheddar cheese on the side offers a surprisingly delightful savory counterpoint that many pie enthusiasts adore. For beverages, a hot cup of coffee, a glass of cold milk, or even a spiced apple cider would be perfect.

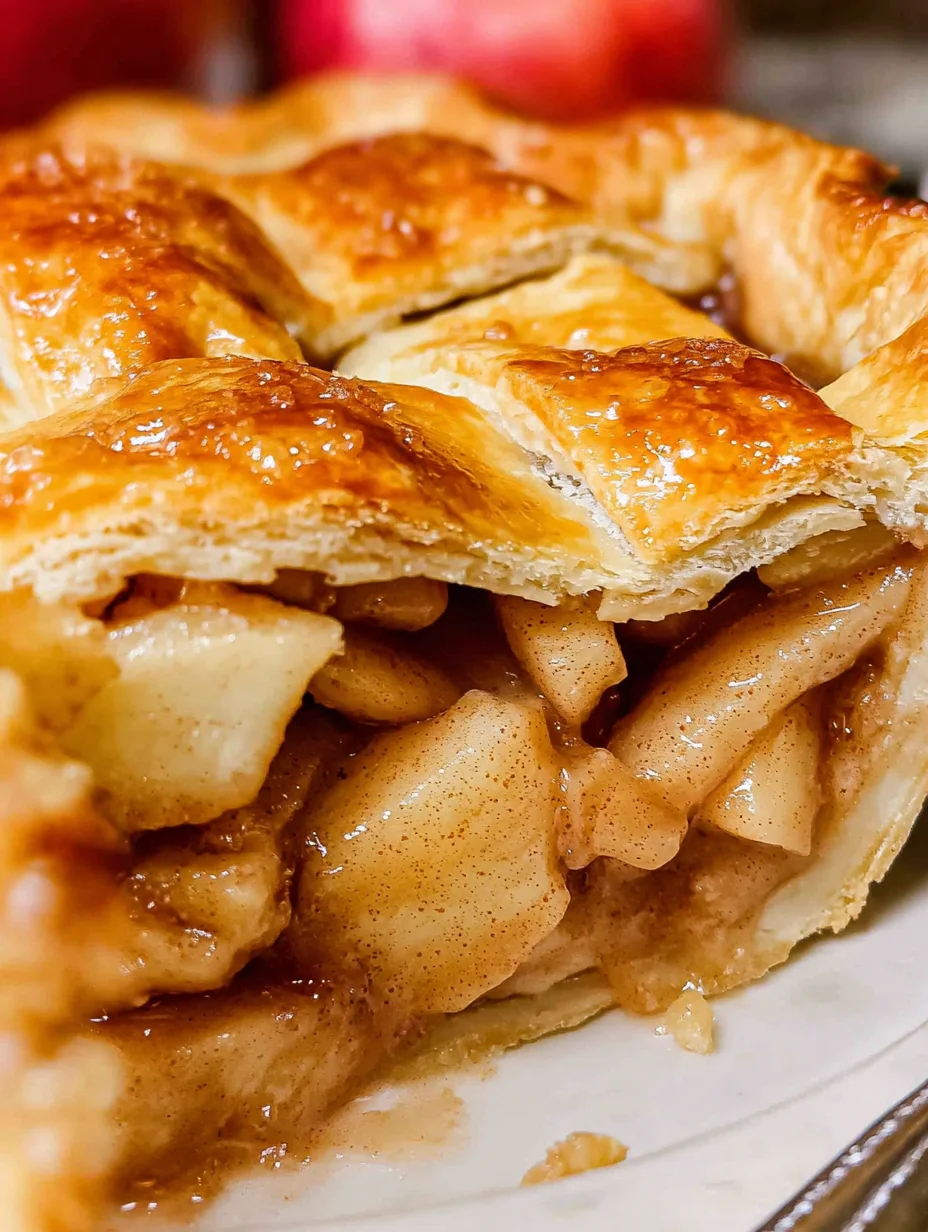
Best Recipe for Apple Pie
This classic recipe for apple pie features a double crust, a cooked filling for the best texture and flavor, and is super easy to make from scratch for the best homemade apple pie of your life!
Timing
Recipe Details
Ingredients
- 01 1 homemade double pie crust ((2 sheets of pie dough))
- 02 1/4 teaspoon lemon zest
- 03 lemon juice (from half a lemon (2 tablespoons))
- 04 5 pounds apples ((5 pounds before peeling and coring))
- 05 3/4 cup brown sugar ((packed))
- 06 3/4 cup granulated sugar
- 07 5 tablespoons all purpose flour
- 08 1/4 teaspoon kosher salt
- 09 1 1/2 teaspoons cinnamon
- 10 3/4 teaspoon nutmeg
- 11 1/2 teaspoon cardamom ((optional))
- 12 1 teaspoon vanilla
- 13 1 tablespoon milk ((for brushing on pie))
- 14 1 tablespoon beaten egg ((optional, for brushing on pie))
- 15 1 tablespoon raw sugar ((for topping pie))
Instructions
Choose your apples. You need 5 pounds of apples for this recipe, which is about 11 large apples. I like to use a mix of apples for the best flavor. For this pie I used Granny Smith, Gala, and Golden Delicious.
Use a microplane grater to zest 1/4 teaspoon lemon peel into a 12 inch high sided skillet.
Add the juice from half the lemon to the skillet, about 2 tablespoons.
Use a potato peeler or this handy apple peeler to peel the apples. Slice the apples into 1/8 inch pieces. Check out the photos above to see my method for slicing apples. I like to peel and slice one apple at a time so that they don't get brown; I peel one apple, then stop and slice it, add it to the lemon juice, and then move on to peeling the next apple. Stir the apples in the pan occasionally to coat everything with lemon juice.
Once you have all the apples peeled and sliced in the pan, set it over medium heat on the stove.
Add 3/4 cup packed brown sugar, 3/4 cup granulated sugar, 5 tablespoons flour, 1/4 teaspoon salt, 1 and 1/2 teaspoons cinnamon, 3/4 teaspoon nutmeg, and 1/2 teaspoon cardamom. Stir it together gently so you don't break all the apples.
Once the mixture is all moistened and you don't see patches of flour or cinnamon, set a timer for 20 minutes. Cover the mixture with a lid but don't walk away. Stick around and stir the mixture every 3 minutes or so, Replacing the lid each time. Cook for 20 minutes, until the apples are fork tender but still hold their shape. The apples will not soften more while baking in the oven. So have a taste and see if you want to cook a longer or shorter time. Only you can know your apple al dente perfection level. If your apples start to stick to the pan, add 1 tablespoon water as needed; use sparingly.
Remove the pan from heat and stir in 1 teaspoon vanilla.
Transfer the apple pie filling (including the brown caramel gooeyness) to a half sheet pan, or any pan with a lip. Spread the apples all the way to the edges. Cool the apple pie filling completely by placing it in the fridge or the freezer, it only takes 30 minutes or so. (If you have plenty of time, you can just leave the apples in the pan to cool down; it will take a couple hours.)
Roll out your pie dough and place in a deep 9 inch pie dish, with the excess hanging over the edges. See my pie crust post for lots of photos and details.
Use a rubber spatula to scrape all the chilled apple pie filling into the pie dish. Don't forget to scrape in every last bit of the gooey filling.
Top your pie with the other pie crust. Follow this recipe for How to Make a Lattice Pie Crust, if you like. It's so pretty and not as hard as you think. You can also just toss the crust on whole. It's going to taste delicious either way! See my pie crust recipe for details on topping with a whole crust.
Fold the edges in and crimp however you like. If you didn't do a lattice, make sure to vent your pie by poking the top a few times with a sharp knife.
Place the whole pie in the fridge or freezer for about 20-30 minutes, for a really flaky crust.
Place a baking sheet in the center rack of your oven and preheat to 425 degrees F. Let it heat up for at least 20-25 minutes to make sure it's really hot.
Right before putting it in the oven, brush the crust of your pie all over with milk or egg, or both. I like to use 1 tablespoon milk beat together with 1 tablespoon beaten egg that I have leftover from making my homemade pie crust. You can just use milk if you don't have beaten egg lying around. Milk will help your pie crust brown but will stay matte; egg will add gloss and shine to your pie crust.
Sprinkle the whole pie with raw sugar, or regular sugar is fine too.
Place the chilled pie onto the baking sheet in the oven and let bake for 15 minutes. The crust on the edge should be turning light brown.
Meanwhile, get a square of tin foil that is the same size as your pie. Fold it in half, then in half again. Cut out the center. Open it up again. You should have a square of foil with a circle cut out of the center. See pie crust post for photos.
Reduce the heat to 350 degrees F. Remove the pie from the oven and place the foil on top. Loosely crimp it around the crust on the edge. This will protect it from burning.
Don't forget to lower the oven temperature to 350. Place the pie back on the baking sheet in the oven and bake at 350 for 40-45 more minutes.
You will know the pie is done when the edges are brown and the center is light golden brown. If you did a lattice crust, you should see the filling bubbling away nicely.
Let the pie cool on a wire rack for about 4 hours. I know, this is killer. But if you cut into it now, the juices will be lava hot and way too liquid-y. You have to wait for it to cool to room temperature to get the right texture for the filling. Pie! A lesson in patience indeed.
Once the pie is completely cool, slice and serve! My husband Eric considers it a crime to serve this without vanilla ice cream, and I tend to agree. Treat yoself right. Add in some caramel sauce for a really decadent treat!
Store the pie on the counter for up to 2 days, covered with plastic wrap. After that transfer it to the fridge.
FILED UNDER:
NUTRITION FACTS (PER SERVING)
Nutrition information is calculated using an ingredient database and should be considered an estimate. In cases where multiple ingredient alternatives are given, the first listed is calculated for nutrition. Garnishes and optional ingredients are not included.
Frequently Asked Questions About Best Apple Pie
Can I make Best Apple Pie ahead of time?
Absolutely! You can prepare the pie dough up to 2-3 days in advance and keep it refrigerated. The assembled, unbaked pie can also be frozen for up to 3 months. When ready to bake, place the frozen pie directly into a preheated oven, adding about 20-30 minutes to the baking time. This Best Apple Pie is very freezer-friendly.
How long does Best Apple Pie last in the fridge?
Your baked Best Apple Pie will stay fresh in the refrigerator for about 4 to 5 days. Make sure it’s covered loosely with plastic wrap or foil to prevent it from drying out. I’d typically enjoy it within three days for the best quality.
What kind of apples are best for Best Apple Pie?
For the Best Apple Pie, I highly recommend a blend of apples. Granny Smith apples offer essential tartness and hold their shape well, while Honeycrisp or Fuji apples add sweetness and firmness. This combination gives you a balanced flavor and a pleasant texture in your filling.
How do I prevent a soggy bottom?
There are a few tricks to avoid a soggy bottom in your Best Apple Pie. First, pre-bake or “blind bake” your bottom crust for about 10-15 minutes before adding the filling. Second, ensure your filling isn’t too wet by tossing the apples with a thickener like cornstarch or flour. Finally, bake the pie on the lowest rack of your oven to ensure the bottom gets adequate direct heat.
Can I substitute butter for shortening in the crust?
While you can, I don’t recommend it for this particular Best Apple Pie if you’re aiming for that rich, buttery, flaky perfection. Shortening produces a very tender and flaky crust, but it lacks the wonderful flavor that pure butter provides. For the truly Best Apple Pie, stick with cold unsalted butter.
What’s the best way to get a golden-brown crust on my Best Apple Pie?
For that beautiful, golden-brown crust, brush the top of your Best Apple Pie with an egg wash (one egg whisked with a tablespoon of water or milk) before baking. You can also sprinkle a little granulated sugar on top for extra sparkle and sweetness. This little step makes a big visual difference.
Should I peel the apples for the Best Apple Pie?
Yes, for the Best Apple Pie, it’s generally recommended to peel the apples. The peel can become tough and chewy during baking, detracting from the smooth, tender texture of the filling. Plus, peeling allows the flavors to meld more seamlessly.
My pie crust cracks when I roll it out. What am I doing wrong?
If your pie crust for your Best Apple Pie is cracking, it likely means it’s either too cold or too dry. Let it sit at room temperature for 5-10 minutes before rolling, or if it’s too dry, lightly sprinkle a tiny bit more ice water onto the cracked areas and gently knead it in.
Final Thoughts
Making the Best Apple Pie is more than just following a recipe; it’s an act of love, a connection to tradition, and a celebration of simple, wholesome ingredients. This truly is the Best Apple Pie recipe, perfected over countless bakes, and I’m so thrilled to share it with you. I encourage you to embrace the process, enjoy the aromas that will fill your kitchen, and savor every single bite of this incredible dessert. Go on, create some delicious memories with your very own homemade Best Apple Pie!