

There’s something magical about the holidays that always pulls me back to the kitchen, and nothing captures that festive spirit quite like Danish Butter Cookies. These delicate, buttery treats, with their melt-in-your-mouth texture and subtle sweetness, remind me of the tins my grandmother used to gift us every Christmas. I’ve spent years perfecting my version of Danish Butter Cookies, and let me tell you, once you try them, you’ll understand why they’re a timeless classic. They’re not just cookies; they’re a warm hug from Denmark itself.
In my experience, baking Danish Butter Cookies is surprisingly straightforward, even if you’re not a pro in the kitchen. What I love most is how versatile they are—you can shape them into wreaths, stars, or simple rounds to suit any occasion. Now, you might be thinking, “Do I really need another cookie recipe?” But trust me, these homemade Danish Butter Cookies will elevate your baking game and become your go-to for gifting or snacking. I’m excited to share this recipe with you, so you can create your own batch of joy.
Coffee cake cookies are great, but if you’re craving something elegantly simple, Danish Butter Cookies hit the spot. Pair them with a cup of tea, and you’ve got perfection. Let’s dive in and get baking!
Grab This Chef Knife Now - Almost Gone!

- Stays Razor-Sharp: Ice-hardened blade keeps its edge longer than ordinary knives
- Superior Grip Control: Unique finger hole design gives you perfect balance and safety
- Built to Last a Lifetime: Premium stainless steel blade with elegant beech wood handle
- ✓ Finally, a knife that stays sharp and feels comfortable in my hand
- ✓ Professional quality without the premium price tag
- ✓ Makes meal prep faster and more enjoyable
⏰ Only a few items left in stock - order soon
Key Takeaways:
- Danish Butter Cookies offer a rich, buttery flavor that’s perfect for holiday celebrations or everyday indulgence.
- This recipe is quick to prepare, taking only about 30 minutes of active time before baking.
- The subtle sweetness and crisp texture make Danish Butter Cookies a crowd-pleaser for all ages.
- Chill the dough for at least an hour to ensure the best shape and flavor in your Danish Butter Cookies.
- Store Danish Butter Cookies in an airtight container to keep them fresh for up to two weeks.
Why You’ll Adore This Danish Butter Cookies
Buttery Goodness in Every Bite: Imagine sinking your teeth into a cookie that’s pure butter heaven— that’s the essence of these Danish Butter Cookies. They’re not overly sweet, allowing the high-quality butter to shine through with its creamy richness. In my kitchen trials, this balance has always won over even the pickiest eaters.
Effortless Elegance: Who doesn’t love a treat that looks fancy but is a breeze to make? These Danish Butter Cookies come together with just a handful of pantry staples, yet they rival any bakery version. Here’s the thing: you can pipe or mold them into beautiful shapes without fancy equipment, making them ideal for beginners.
Versatile for Any Occasion: From holiday cookie swaps to afternoon tea, Danish Butter Cookies fit right in. Their neutral yet delightful flavor pairs wonderfully with dips like chocolate ganache or even a sprinkle of sea salt. I’ve served them at parties, and they always disappear first—proof of their universal appeal.
Healthier Indulgence Option: Let’s be honest, not all cookies are created equal, but these use simple ingredients without artificial additives. You control the quality, opting for unsalted butter and organic flour for a treat that feels indulgent without the guilt. What I find interesting is how satisfying they are, so you won’t need a dozen to feel content.
Essential Ingredients for Danish Butter Cookies
Unsalted Butter: The star of Danish Butter Cookies is undoubtedly the butter—use high-quality, unsalted varieties for the purest flavor. It provides the melt-in-your-mouth texture that’s signature to this recipe, creaming beautifully with sugar to create a light dough. In my experience, room-temperature butter ensures even mixing, preventing any lumps that could affect the final Danish Butter Cookies’ consistency. Without it, you just won’t get that authentic Danish richness.
Powdered Sugar: This fine sugar dissolves easily, giving Danish Butter Cookies their signature smoothness without graininess. It adds just the right amount of sweetness to complement the butter’s savoriness, creating a balanced taste profile. I always sift it first to avoid any clumps, which helps in achieving that professional look and feel in every batch.
All-Purpose Flour: The backbone of Danish Butter Cookies, this flour provides structure while keeping the cookies tender. It absorbs the butter and sugar mixture perfectly, forming a dough that’s easy to work with. For the best results, measure it by spooning into the cup rather than packing, as too much can make your Danish Butter Cookies tough instead of delicate.
How to Make Danish Butter Cookies
Prepare the Dough
Start by beating the softened butter and powdered sugar together until creamy and light—this is crucial for the tender crumb in your Danish Butter Cookies. Add the vanilla extract and a pinch of salt, mixing just until incorporated. Gradually fold in the flour to form a soft dough, being careful not to overmix, as that can lead to dense cookies. Wrap the dough in plastic and chill for at least one hour; this step helps the flavors meld and makes shaping easier. In my experience, this resting time is non-negotiable for authentic Danish Butter Cookies.
Shape and Bake
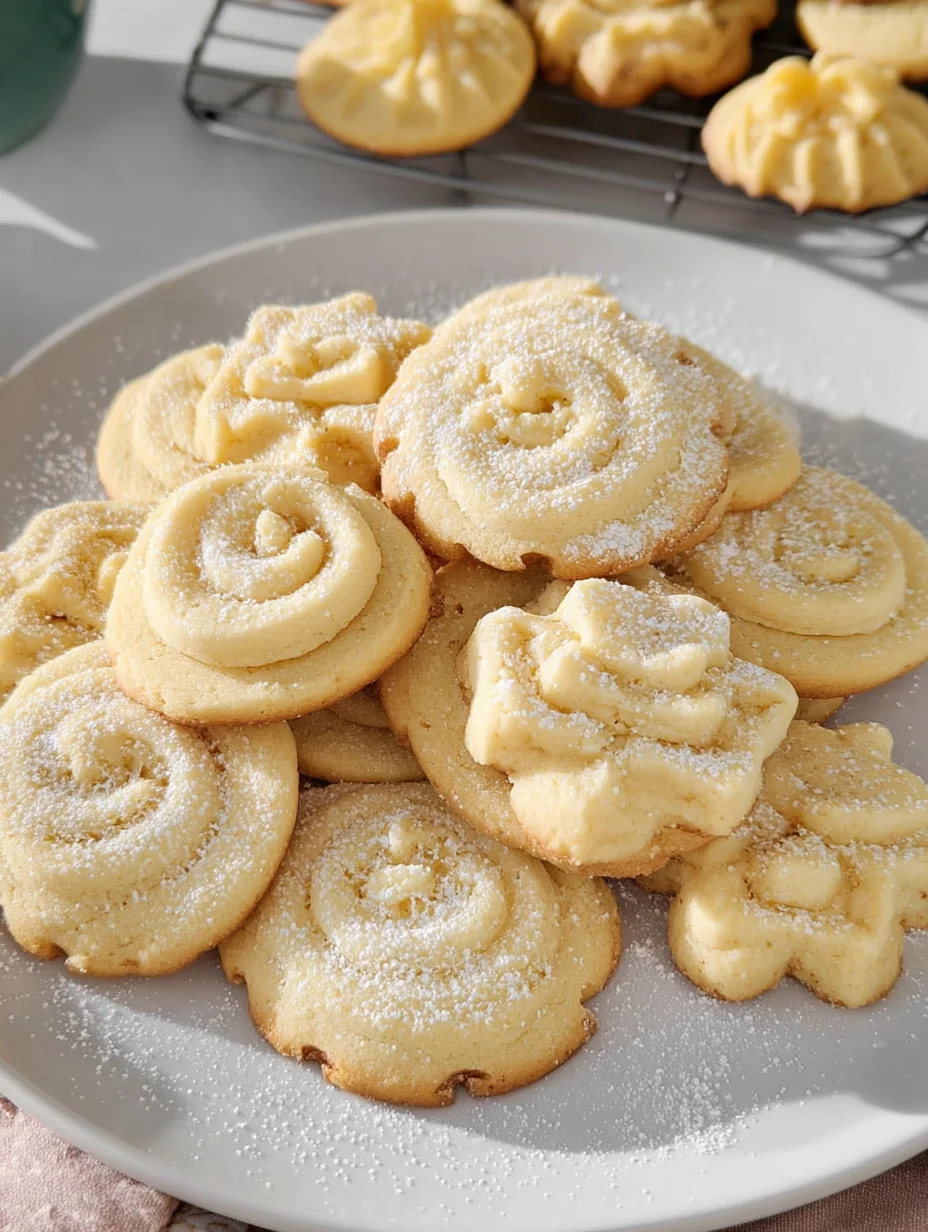
Preheat your oven to 350°F and line baking sheets with parchment paper for easy release. Using a cookie press or piping bag, form the chilled dough into small rounds or decorative shapes on the sheets—the fun part is getting creative here. Space them about two inches apart, as they spread slightly, and bake for 10-12 minutes until the edges are just golden. You’ll smell that heavenly buttery aroma filling your kitchen, a sign they’re almost ready. Let them cool on the sheet for a few minutes before transferring to a wire rack; this prevents breakage and sets the structure perfectly.
Cool and Enjoy
Once baked, allow your Danish Butter Cookies to cool completely to achieve that signature crispness. Dust with a light sprinkle of powdered sugar if desired, for an extra touch of elegance. These cookies store well, but honestly, they rarely last long in my house. The cooling process locks in the flavors, making each bite of Danish Butter Cookies even more rewarding. For a twist, check out this lemon crinkle cookies recipe to vary your cookie lineup.
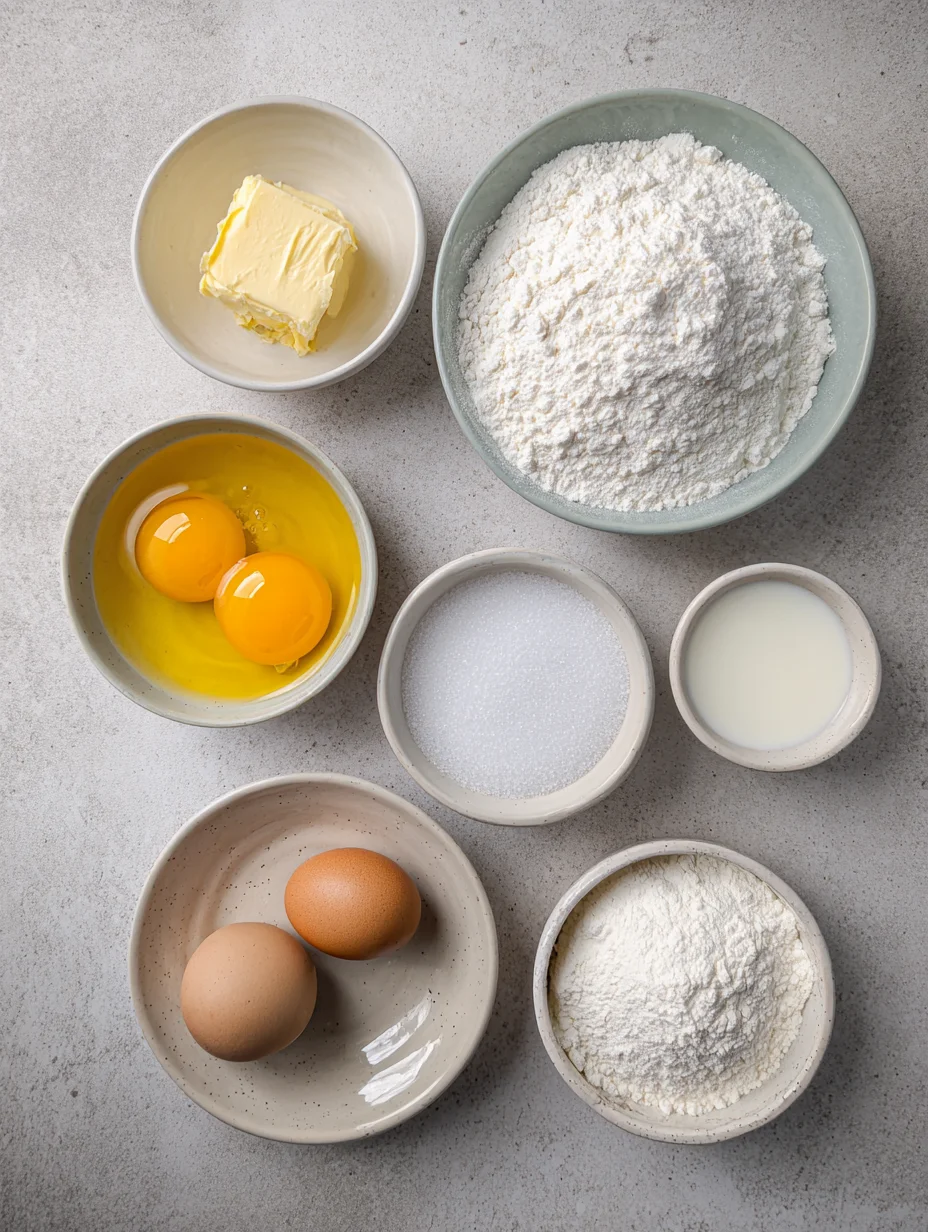
Ingredients
- 1 cup (2 sticks) unsalted butter, softened
- 1/2 cup powdered sugar, plus extra for dusting
- 1 teaspoon vanilla extract
- 2 cups all-purpose flour
- 1/4 teaspoon salt
- Optional: 1/2 teaspoon almond extract for nutty flavor
Danish Butter Cookies Instructions
- In a large bowl, cream together the softened butter and powdered sugar using an electric mixer on medium speed until light and fluffy, about 2-3 minutes.
- Beat in the vanilla extract and salt until well combined.
- Gradually add the flour, mixing on low speed until a soft dough forms. Do not overmix.
- Wrap the dough in plastic wrap and refrigerate for at least 1 hour, or up to overnight.
- Preheat oven to 350°F (175°C). Line baking sheets with parchment paper.
- Fill a cookie press or piping bag with the dough and press out shapes onto the prepared sheets, spacing 2 inches apart.
- Bake for 10-12 minutes, or until edges are lightly golden. Do not let them brown too much.
- Cool on the baking sheet for 5 minutes, then transfer to a wire rack to cool completely.
- Dust with powdered sugar before serving, if desired.
Pro Tips for the Best Danish Butter Cookies
Chill Thoroughly: Always chill your dough well; it prevents spreading and ensures crisp Danish Butter Cookies that hold their shape beautifully.
Use Quality Butter: Opt for European-style butter with higher fat content for richer, more authentic-tasting Danish Butter Cookies.
Grab This Kitchen Scale Now — Best Precision Pick!

- Razor-Accurate Every Time: Dual-increment precision down to 0.1g — perfect for baking, meal prep, and portion control with g, oz, ml, and fl'oz modes.
- Smart Removable Bowl Design: Detachable bowl doubles as a protective case for compact storage. Tare function lets you weigh ingredients in any container with zero fuss.
- Built for Everyday Convenience: Auto-zero, tare function, low battery alert, overload indicator, and 2-minute auto-off to extend battery life — all in a sleek stainless steel build.
- ✓ "Perfect for baking — precise, lightweight, and stores easily without wasting counter space"
- ✓ "A game changer! Weighing ingredients is now way more accurate than measuring cups"
- ✓ "Love the 0.1g precision and backlight — best food scale I've owned. Highly recommend!"
⏰ Only a few items left in stock - order soon
Avoid Overbaking: Pull them from the oven when just golden at the edges—these cookies firm up as they cool, so err on the side of underdone for tenderness.
You Must Know
- Danish Butter Cookies traditionally use high-fat butter for their signature melt-away texture.
- The dough can be made up to two days in advance for convenience.
- Baking at a moderate temperature prevents the cookies from browning too quickly.
- These cookies freeze well, both as dough or baked, for up to three months.
How to Store Danish Butter Cookies
To keep your Danish Butter Cookies fresh and crisp, store them in an airtight container at room temperature for up to two weeks. If you live in a humid area, a slice of bread in the container can help absorb moisture and maintain texture. For longer storage, freeze the baked Danish Butter Cookies in a freezer bag for up to three months—they thaw quickly and taste just as delicious. Reheating isn’t necessary, but a quick warm-up in a 300°F oven for two minutes revives their buttery aroma.
Customizing Your Danish Butter Cookies
Feel free to add a touch of citrus zest, like lemon or orange, to the dough for a refreshing twist on classic Danish Butter Cookies. If you’re gluten-free, swap in a 1:1 baking flour blend, and it works wonders without sacrificing texture. For chocolate lovers, dip half the cooled cookies in melted dark chocolate—simple yet elegant. Check out this espresso chocolate chip cookies recipe for more inspiration on flavor pairings.
However, stick close to the original ratios to ensure that melt-in-your-mouth quality remains intact in your Danish Butter Cookies.
What to Serve with Danish Butter Cookies
These versatile Danish Butter Cookies shine alongside a steaming cup of coffee or Earl Grey tea, balancing their richness with a hot beverage. For a dessert spread, pair them with fresh berries and whipped cream for an effortless parfait. If you’re hosting, serve with fruit-based salads or even a charcuterie board featuring cheeses—the buttery notes complement mild varieties like brie. Don’t forget holiday drinks like mulled wine; the subtle sweetness enhances the spiced warmth beautifully.
Danish Butter Cookies (Melt in your mouth)
These melt-in-your-mouth Danish butter cookies are synonymous with nostalgia and the holiday season. These simple and delicious butter cookies are perfect for gifting this year!
Timing
Recipe Details
Ingredients
- 01 1 cup European salted butter ((227 g, room temperature))
- 02 1/2 cup granulated sugar ((100 g))
- 03 1/8 teaspoon salt
- 04 2 egg yolks
- 05 2 teaspoons vanilla extract ((10 g))
- 06 1 tablespoon whole milk ((15 g, or more to soften))
- 07 2 cups all-purpose flour ((220 g))
- 08 1/2 cup cake flour ((50 g))
- 09 coarse sugar ((for decorating))
Instructions
Make space in the refrigerator and prep the baking mats. Make room in your refrigerator for a baking sheet so the shaped cookies can chill for 20-30 minutes. Without chilling, the piped cookies may over-spread. Line two baking sheets with parchment paper or a silicone baking mat. Set aside.
Cream butter, sugar salt. In the bowl of a stand mixer fitted with a paddle attachment, cream butter on medium speed until smooth. With the mixer still running on low, slowly add in sugar and salt. Mix on medium speed until light and fluffy.
Incorporate egg yolks, vanilla, and milk. While mixing, add egg yolks, vanilla, and milk. Continue to mix on medium speed until well combined. Scrape down the sides of the bowl for thorough mixing.
Mix dry ingredients and add into mixture. In a medium-sized mixing bowl, whisk the flour, and cake flour. Add flour mixture to mixer in two additions, and scrape down the sides of the bowl. Mix on low speed until combined and no traces of flour. If the batter is too thick to pipe, add another tablespoon of milk to soften.
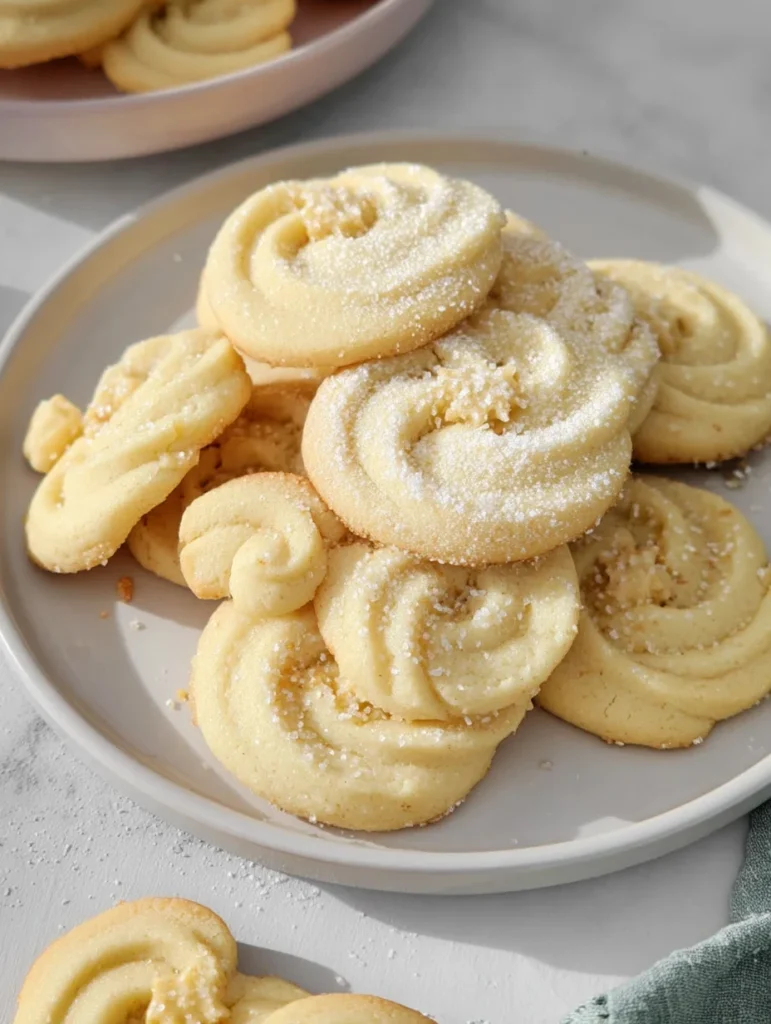
Pipe the cookies. Transfer cookie batter to a large piping bag with fitted a ½-inch open star tip. Pipe 2-inch cookies (rosettes, pretzels, circles, squares) on a prepared baking sheet. Space cookies at least 2-inches apart. If desired, sprinkle the dough with festive sprinkles and/or coarse sugar. Chill in the refrigerator for 20-30 minutes.
Prepare the oven. Preheat oven to 350°F. Make sure the baking rack is in the middle of the oven.
Bake. Bake for 10-15 minutes or until the edges are JUST lightly golden brown. Let cookies cool on the baking sheet for about 5 minutes before transferring to a wire rack to cool to room temperature.
FILED UNDER:
NUTRITION FACTS (PER SERVING)
Nutrition information is calculated using an ingredient database and should be considered an estimate. In cases where multiple ingredient alternatives are given, the first listed is calculated for nutrition. Garnishes and optional ingredients are not included.
Frequently Asked Questions About Danish Butter Cookies
Can I make Danish Butter Cookies ahead of time?
Absolutely, you can prepare the dough up to two days in advance and store it in the fridge, or freeze it for up to a month. Just thaw slightly before shaping and baking for fresh-tasting results. This makes them perfect for busy holiday baking schedules.
How long does Danish Butter Cookies last in the fridge?
Baked Danish Butter Cookies can stay fresh in the fridge for up to one week in an airtight container. However, I recommend room temperature storage to preserve their crisp texture. If refrigerated, let them come to room temp before enjoying.
Why are my Danish Butter Cookies spreading too much?
Spreading often happens if the dough isn’t chilled enough or if the butter was too soft. Ensure at least an hour of chilling next time, and work quickly when shaping. This simple step keeps your Danish Butter Cookies perfectly formed.
Can I add nuts or chocolate to Danish Butter Cookies?
Yes, folding in chopped almonds or chocolate chips works great for customized Danish Butter Cookies. Add about 1/2 cup during the flour mixing stage. For more ideas, explore s’mores cookies recipe variations.
Are Danish Butter Cookies gluten-free?
The traditional version isn’t, but you can easily adapt by using a gluten-free flour blend. Test a small batch first to adjust texture. They come out just as buttery and delicious.
What if I don’t have a cookie press for Danish Butter Cookies?
No problem—roll the dough into balls and flatten slightly with a fork for rustic Danish Butter Cookies. Or use a spoon to portion and shape by hand. The flavor remains spot-on regardless of the method.
How do I achieve the professional look for Danish Butter Cookies?
Dusting with powdered sugar after cooling gives that elegant finish to your Danish Butter Cookies. Use a fine sieve for even coverage. Practice with the press on parchment first if you’re new to it.
Can Danish Butter Cookies be vegan?
Yes, substitute with plant-based butter and a vegan sugar alternative. The dough behaves similarly, yielding tender results. I’ve tried it, and it’s a hit with dairy-free friends. See lemon blueberry cookies for more vegan-friendly tips.
Final Thoughts
From the first creamy bite to the last crumb, these Danish Butter Cookies bring a slice of Danish tradition right to your table, filling your home with warmth and the scent of fresh baking. I hope this recipe becomes a staple in your kitchen, just as it has in mine—simple, satisfying, and endlessly shareable. Give it a try this weekend, and let me know how your Danish Butter Cookies turn out; tag your bakes online for some community love!