

Remember those irresistible Choco Tacos from the ice cream truck? Well, I’ve taken that nostalgic treat and made it even better with my Homemade Choco Tacos recipe. There’s something magical about biting into a crunchy shell coated in chocolate, filled with creamy ice cream and topped with nuts—it’s pure summer bliss right in your kitchen. In my experience, whipping up Homemade Choco Tacos at home lets you control the freshness and flavors, turning a simple dessert into a family favorite that everyone raves about.
Now, you might be thinking, “Can I really make Homemade Choco Tacos without fancy equipment?” Absolutely! This recipe is straightforward, using everyday ingredients like tortillas, chocolate, and your favorite ice cream. I’ve perfected it over countless summer barbecues, and let me tell you, the homemade version blows the store-bought ones out of the water. Here’s the thing: once you try these delicious Homemade Choco Tacos, you’ll never go back. Get ready to impress your loved ones—I’m excited to share every step with you!
Key Takeaways:
- Homemade Choco Tacos offer a customizable twist on the classic ice cream treat, perfect for summer gatherings.
- Prep time is just 30 minutes, with minimal baking required for quick assembly.
- The combination of crunchy shell, rich chocolate, and creamy filling delivers unbeatable flavor balance.
- Shape the shells carefully while warm for the perfect taco form that holds up to fillings.
- Store extras in the freezer for up to a week—ideal for impromptu dessert cravings.
Why You’ll Adore This Homemade Choco Tacos
Endless Customization Options: One of the best parts about Homemade Choco Tacos is how easy they are to personalize. Swap in different ice cream flavors or add fun toppings like sprinkles or fruit—I’ve even tried a peanut butter swirl that was divine. It’s all about making it your own, and that creativity keeps things exciting every time.
Grab This Chef Knife Now - Almost Gone!

- Stays Razor-Sharp: Ice-hardened blade keeps its edge longer than ordinary knives
- Superior Grip Control: Unique finger hole design gives you perfect balance and safety
- Built to Last a Lifetime: Premium stainless steel blade with elegant beech wood handle
- ✓ Finally, a knife that stays sharp and feels comfortable in my hand
- ✓ Professional quality without the premium price tag
- ✓ Makes meal prep faster and more enjoyable
⏰ Only a few items left in stock - order soon
Quick and Fun to Make: Let’s be honest, who doesn’t love a dessert that comes together in under an hour? These Homemade Choco Tacos are a breeze for beginners, yet impressive enough for parties. In my experience, the kids get involved in shaping the shells, turning prep into a joyful family activity that creates lasting memories.
Perfectly Balanced Flavors: The contrast of textures—crisp shell, smooth chocolate, and cold ice cream—makes every bite sensational. What I find interesting is how the nuts add that satisfying crunch, elevating the Homemade Choco Tacos to gourmet status without extra effort. You’ll savor the harmony of sweet and nutty notes that linger deliciously.
Nostalgic Yet Elevated: There’s a comforting throwback to childhood with these treats, but making them homemade adds a fresh, artisanal touch. I love serving them at barbecues alongside classics like oatmeal chocolate chip cookies for a dessert spread that’s both familiar and innovative. Trust me, your guests will be asking for seconds!
Essential Ingredients for Homemade Choco Tacos
Flour Tortillas: These form the base of your Homemade Choco Tacos, providing that essential crunch when baked. Opt for small, soft ones about 6 inches in diameter—they crisp up beautifully without breaking. In my experience, warming them slightly before shaping prevents cracks, ensuring your Homemade Choco Tacos hold their taco shape perfectly. They’re versatile too, absorbing the chocolate coating just right for added flavor depth.
Semi-Sweet Chocolate Chips: Melting these creates the signature shell that encases the filling, adding a rich, decadent layer to Homemade Choco Tacos. Choose high-quality chips for smoother melting and better taste—they shouldn’t be too bitter to balance the sweetness inside. I’ve found that a touch of coconut oil helps achieve that glossy finish, making your Homemade Choco Tacos look professionally tempting.
Vanilla Ice Cream: The creamy heart of Homemade Choco Tacos, this provides cool contrast to the warm shell and chocolate. Soften it slightly for easy scooping and molding, which helps it fit snugly without leaking. What I love is how vanilla lets other flavors shine, but you can experiment—it’s forgiving and always results in Homemade Choco Tacos that melt in your mouth just right.
How to Make Homemade Choco Tacos
Prepare and Crisp the Shells
Start by preheating your oven to 375°F and lining a baking sheet with parchment paper for easy cleanup. Take your flour tortillas and lightly brush one side with melted butter—this helps them crisp up golden and adds a subtle richness to your Homemade Choco Tacos. Drape each tortilla over two oven rack bars or use a makeshift mold with foil to form the taco shape, then bake for 8-10 minutes until they’re firm and lightly browned. In my experience, checking them midway prevents over-baking, ensuring the shells stay pliable enough to handle once cooled slightly. The aroma filling your kitchen will have everyone excited for these delicious Homemade Choco Tacos.
Melt and Dip in Chocolate
While the shells cool, melt the semi-sweet chocolate chips with a bit of coconut oil in a microwave-safe bowl, stirring every 30 seconds for even consistency—aim for a smooth, pourable texture. Dip the open ends of each cooled shell into the chocolate, letting excess drip off, then place them on a wire rack over waxed paper to set. This step coats the shells beautifully, creating that irresistible crackly layer you’ll love in Homemade Choco Tacos. Timing is key here; the chocolate firms up quickly, so work efficiently to avoid mess. The glossy shine that results makes your Homemade Choco Tacos look bakery-fresh and utterly tempting.
Fill and Top Your Tacos
Scoop softened vanilla ice cream into each chocolate-dipped shell, filling generously but not overflowing—about 1/4 cup per taco works perfectly for balance. Press in chopped peanuts or your favorite nuts along the top for crunch, then freeze on a tray for 20 minutes to set everything in place. These Homemade Choco Tacos come alive with the cold creaminess against the crisp exterior, and the nuts add a delightful texture contrast. Serve immediately for the best experience, or wrap individually if storing. I’ve made these for parties, and they always disappear fast—such a crowd-pleaser!
Ingredients
- 6 small flour tortillas (6-inch)
- 2 tablespoons melted butter
- 12 ounces semi-sweet chocolate chips
- 1 tablespoon coconut oil
- 1.5 quarts vanilla ice cream, softened
- 1/2 cup chopped peanuts or toasted almonds
- Optional: Sprinkles or mini chocolate chips for garnish
Homemade Choco Tacos Instructions
- Preheat oven to 375°F. Brush one side of each tortilla with melted butter. Drape over oven rack bars or foil molds to form taco shapes and bake for 8-10 minutes until crisp. Cool slightly.
- Melt chocolate chips with coconut oil in microwave, stirring until smooth. Dip shell openings into chocolate and let set on a wire rack.
- Scoop ice cream into shells, top with nuts, and freeze for 20 minutes. Serve cold.
This yields 6 Homemade Choco Tacos—scale up as needed for larger crowds.
Pro Tips for the Best Homemade Choco Tacos
Shell Shaping Hack: Use oven mitts to gently press the warm tortillas into shape right after baking—this ensures your Homemade Choco Tacos hold their form without cracking.
Chocolate Melting Secret: Add a pinch of sea salt to the melted chocolate for enhanced flavor that elevates the sweetness in your Homemade Choco Tacos.
Grab This Kitchen Scale Now — Best Precision Pick!

- Razor-Accurate Every Time: Dual-increment precision down to 0.1g — perfect for baking, meal prep, and portion control with g, oz, ml, and fl'oz modes.
- Smart Removable Bowl Design: Detachable bowl doubles as a protective case for compact storage. Tare function lets you weigh ingredients in any container with zero fuss.
- Built for Everyday Convenience: Auto-zero, tare function, low battery alert, overload indicator, and 2-minute auto-off to extend battery life — all in a sleek stainless steel build.
- ✓ "Perfect for baking — precise, lightweight, and stores easily without wasting counter space"
- ✓ "A game changer! Weighing ingredients is now way more accurate than measuring cups"
- ✓ "Love the 0.1g precision and backlight — best food scale I've owned. Highly recommend!"
⏰ Only a few items left in stock - order soon
Freezing Fix: Wrap individual Homemade Choco Tacos in plastic before freezing to prevent freezer burn and keep them tasting fresh.
You Must Know
- Homemade Choco Tacos are best eaten fresh, as the shells soften over time with moisture from the ice cream.
- Allergens include dairy in ice cream and potential nuts—check labels for cross-contamination.
- This recipe is gluten-containing from tortillas; use corn versions for a gluten-free twist on Homemade Choco Tacos.
- Chocolate sets faster in cooler rooms, so prepare your dipping station ahead for smooth assembly.
How to Store Homemade Choco Tacos
To keep your Homemade Choco Tacos tasting great, wrap each one individually in plastic wrap and store in an airtight container in the freezer for up to one week. Avoid stacking them to prevent sticking from the ice cream. For reheating, let them thaw slightly at room temperature for 5 minutes before enjoying—the chocolate shell regains its snap, and the filling stays creamy. If you’re making ahead, assemble shells and chocolate first, then fill just before serving to maintain crispness.
Customizing Your Homemade Choco Tacos
Feel free to swap vanilla ice cream for flavors like chocolate or strawberry in your Homemade Choco Tacos—I’ve had great success with mint chip for a refreshing twist. For nut-free options, try crushed pretzels or granola instead of peanuts, adding a salty crunch. If you’re feeling adventurous, incorporate dulce de leche inside for extra indulgence. These variations keep things exciting; check out our Mexican hot chocolate cookies for spicy topping ideas that pair wonderfully with the chocolate shell.
What to Serve with Homemade Choco Tacos
These treats shine as a standalone dessert, but pair them with fresh summer salads like a broccoli salad with bacon for a light contrast. For beverages, go with iced coffee or fruity sangria to cut through the richness—non-alcoholic sparkling water with lime works too. If hosting, add grilled fruits or a cheese platter nearby; the cool Homemade Choco Tacos balance warm, savory bites beautifully. It’s all about creating a spread that feels effortless yet thoughtful.
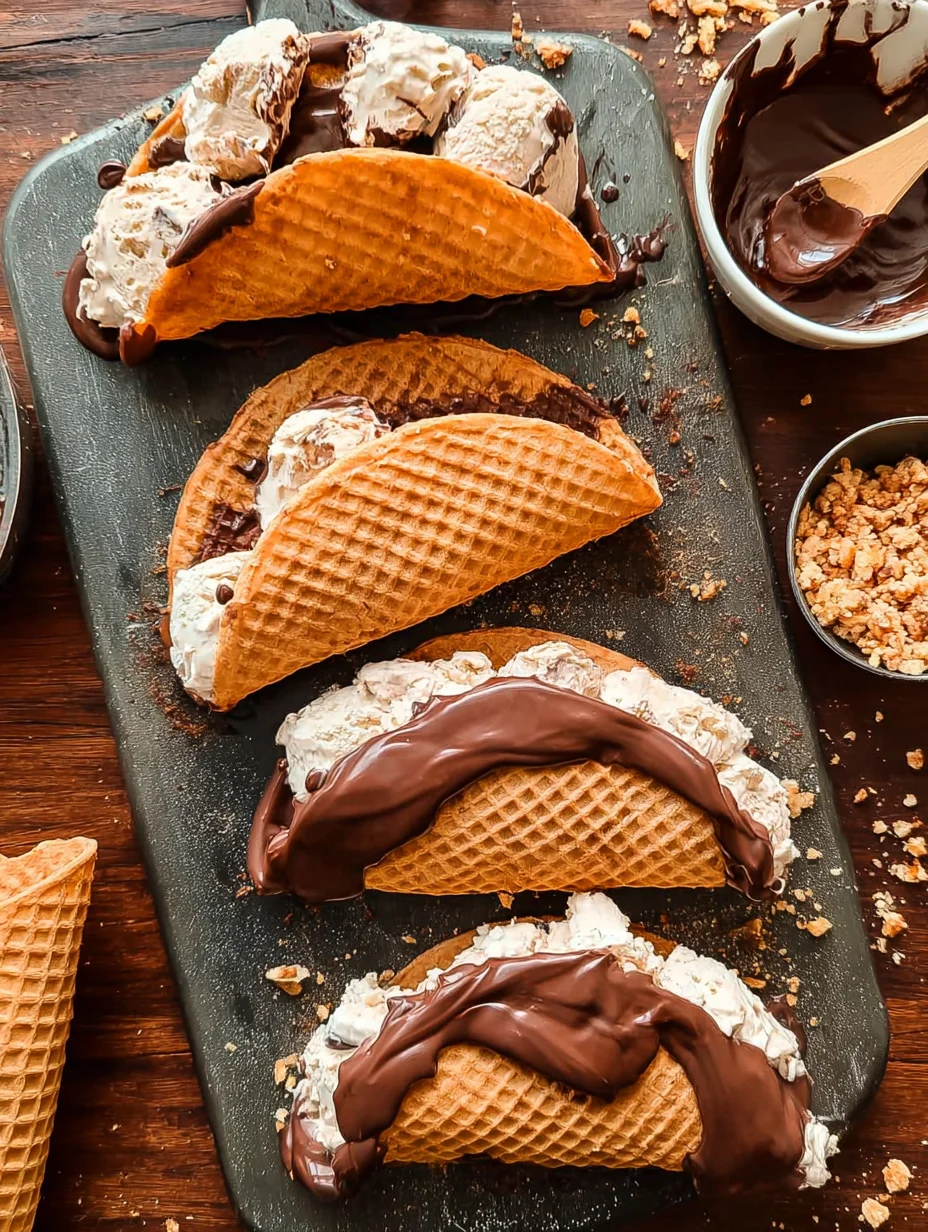
Homemade Choco Tacos
These homemade Choco Tacos are a fun, nostalgic treat that's perfect for summer! No churn fudge-swirled vanilla ice cream is stuffed inside a sweet and crispy waffle cone, then the whole thing is dipped in a chocolate and chopped peanut mixture.
Timing
Recipe Details
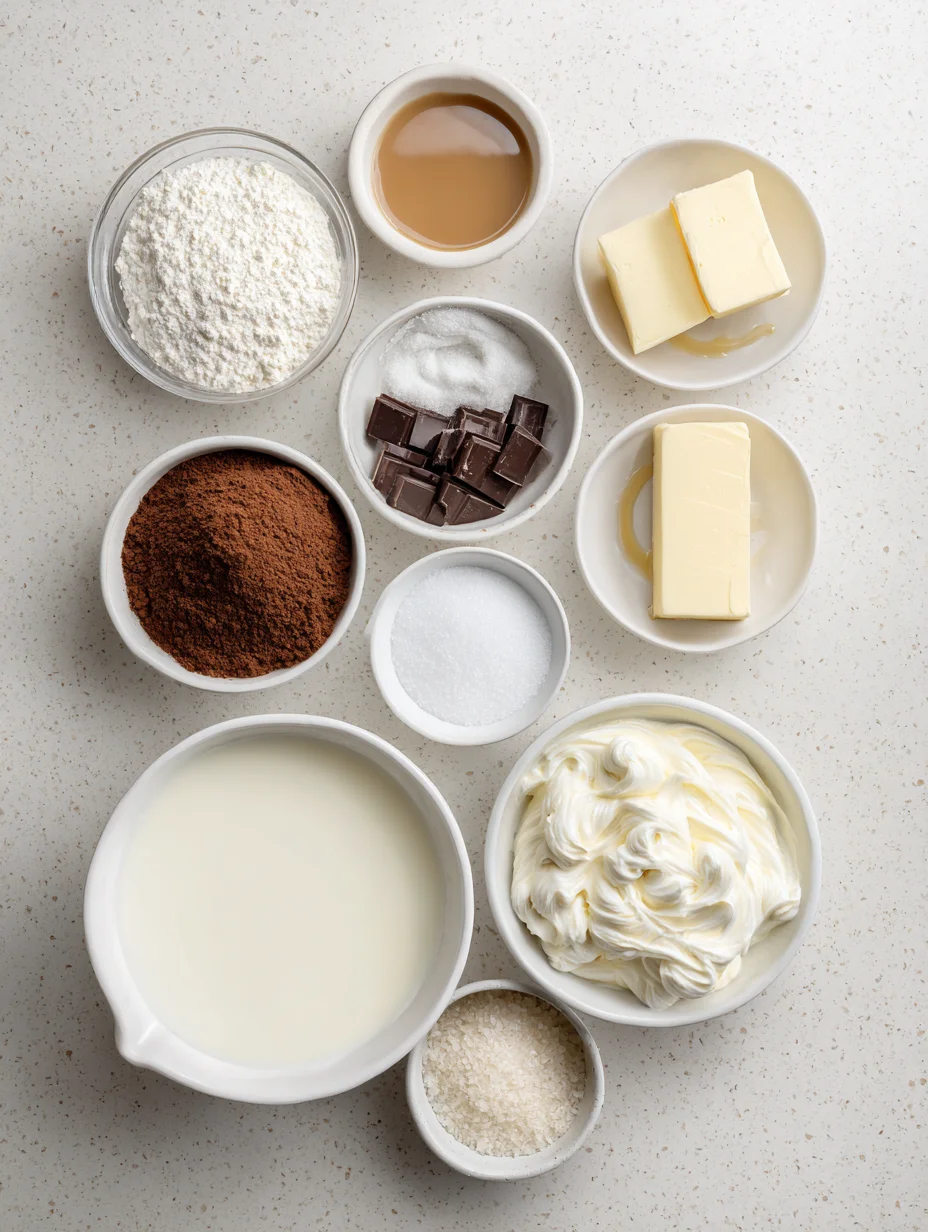
Ingredients
- 01 2 cups heavy cream, cold
- 02 1 14oz can sweetened condensed milk
- 03 1 tbsp or 2 tsp vanilla bean paste or vanilla extract
- 04 Pinch salt
- 05 2 tablespoons cocoa powder
- 06 2 tablespoons granulated sugar
- 07 2 tablespoons heavy cream
- 08 1 tablespoon unsalted butter
- 09 1/2 teaspoon vanilla extract
- 10 Pinch salt
- 11 2 egg whites
- 12 3 1/2 tablespoons granulated sugar
- 13 3 1/2 tablespoons brown sugar
- 14 3/4 teaspoon vanilla extract
- 15 1/8 teaspoon salt
- 16 2/3 cup flour
- 17 2 tbsp melted butter
- 18 1 1/2 cups chocolate chips
- 19 1 1/2 tablespoon coconut oil
- 20 3/4 cup finely chopped peanuts
Instructions
Make the fudge sauce for the ice cream ripple. In a small saucepan, whisk together the cocoa powder, sugar and heavy cream over medium-low heat. Once it starts to heat up, add in the butter and whisk until the butter is melted and the mixture is smooth and shiny. Remove from heat and whisk in the vanilla and salt. Set aside to cool.
Prepare the ice cream base. Add heavy cream to a stand mixer (or a bowl with a hand mixer) and beat until stiff peaks form (a few minutes). In a large bowl, mix together condensed milk, vanilla bean paste and salt. Add about 1 cup of the whipped cream in and gently fold it in, then add in the remaining whipped cream and fold until no lumps remain.
Layer the ice cream. Pour 1/4 of the ice cream base into a loaf pan, then drizzle on 1/3 of the fudge sauce. Repeat 3 more times, finishing with a layer of ice cream. Freeze until set – about 3 hours.
Make the waffle cones. Add egg whites, both sugars and vanilla extract to a bowl and beat with a hand mixer until well combined. Add in salt and half of the flour and continue mixing until smooth. Add in remaining flour and melted butter and mix until a smooth batter forms. The batter should be thick. Preheat waffle cone maker to just above medium heat. Place one heaping tablespoon of batter in the center of the waffle cone maker, then close it. Every waffle cone maker will cook differently, but ours took about 3 minutes to get golden brown. Remove with tongs, let cool for a few seconds, then (carefully) shape into a taco shape with your hands and hold in place for 15 seconds. They will harden in less than a minute.
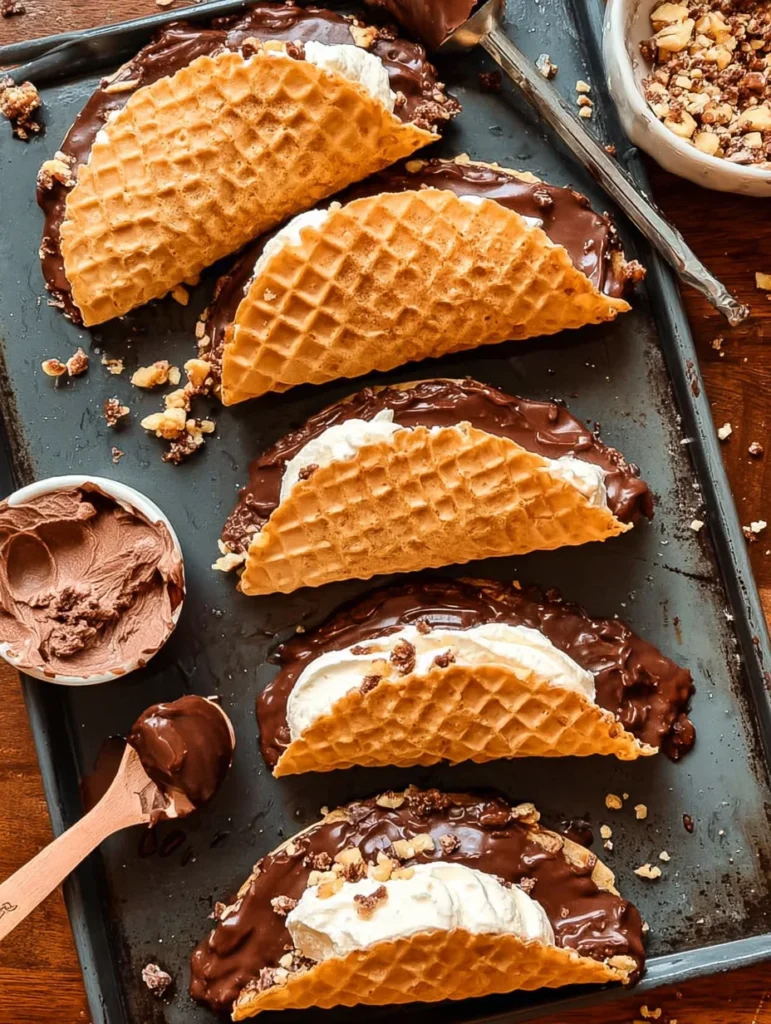
Scoop ice cream into shells and freeze briefly. Scoop slightly softened ice cream into each of the “taco” cones, using a small spatula or the back of a spoon to smooth out the ice cream. Place in freezer for 10-15 minutes.
Prepare peanut-chocolate topping and assemble. Add chocolate chips and coconut oil to a microwave safe bowl. Microwave in 30 second intervals, stirring well between each interval, until fully melted. Stir in chopped peanuts. Dip the top of ice cream taco in the chocolate peanut mixture. Return to freezer for 5-10 minutes, or until hardened. Keep stored in freezer.
FILED UNDER:
NUTRITION FACTS (PER SERVING)
Nutrition information is calculated using an ingredient database and should be considered an estimate. In cases where multiple ingredient alternatives are given, the first listed is calculated for nutrition. Garnishes and optional ingredients are not included.
Frequently Asked Questions About Homemade Choco Tacos
Can I make Homemade Choco Tacos ahead of time?
Yes, you can prepare the shells and chocolate coating a day in advance, storing them unfilled to stay crisp. Assemble with ice cream right before serving for the best texture in your Homemade Choco Tacos. This method saves time without sacrificing quality—I’ve done it for parties with great results.
How long does Homemade Choco Tacos last in the fridge?
While they’re best frozen, if you must refrigerate, they hold up for 1-2 days wrapped tightly, though the shell may soften. Freezing is preferable for up to a week to maintain that signature crunch. Always thaw briefly for optimal enjoyment.
Are Homemade Choco Tacos gluten-free?
Not with standard flour tortillas, but you can easily substitute corn tortillas or gluten-free wraps. Bake them similarly, and they’ll crisp up just fine for delicious Homemade Choco Tacos that everyone can enjoy. Check our cheesy root vegetable gratin for more gluten-free inspiration.
What’s the best chocolate for Homemade Choco Tacos?
Semi-sweet chocolate chips work wonders for balance, but dark chocolate adds a sophisticated edge to your Homemade Choco Tacos. Melt with oil for smoothness—avoid milk chocolate if you want less sweetness overpowering the ice cream.
Can kids help make Homemade Choco Tacos?
Absolutely, it’s a fun, hands-on recipe for little ones. They can scoop ice cream and sprinkle nuts while you handle the hot shells. Just supervise to keep it safe and enjoyable.
How do I prevent the ice cream from leaking in Homemade Choco Tacos?
Stuff the shells moderately and freeze immediately after filling—this sets the Homemade Choco Tacos firmly. Soften the ice cream just enough for packing, and the chocolate acts as a barrier. If leaks happen, no worries; it’s still tasty!
Vegetarian-friendly?
Yes, this recipe is naturally vegetarian, using dairy ice cream and plant-based chocolate options available. For vegan Homemade Choco Tacos, swap in coconut-based ice cream and dairy-free chocolate—delicious alternatives that work seamlessly.
Can I bake the shells in an air fryer?
Sure, air fry at 350°F for 4-5 minutes, checking for crispness. It’s quicker and uses less oil, perfect for small batches of Homemade Choco Tacos. Experiment to find your machine’s sweet spot.
Final Thoughts
From the first crunchy bite to the last melty spoonful, these Homemade Choco Tacos capture all the joy of a classic treat with your personal touch. I’ve shared this recipe because it’s become a staple in my home, bringing smiles and “wows” every time. Why not whip up a batch this weekend? Your taste buds—and your family—will thank you; share your twists in the comments below!