

Have you ever craved that sweet, savory explosion of flavors from your favorite Chinese takeout but didn’t want to wait for delivery? That’s exactly how I felt one busy weeknight when I decided to whip up some Mongolian Beef at home. This Mongolian Beef recipe is incredibly simple, using just a handful of pantry staples to create tender, crispy beef coated in a glossy, addictive sauce that rivals any restaurant version. I’ve made it countless times, and let me tell you, it’s become our go-to for quick dinners that feel indulgent without the hassle.
What I love most about preparing Mongolian Beef is how it transforms basic ingredients into something extraordinary – think thinly sliced flank steak that’s fried to perfection and then tossed in a ginger-garlic-soy glaze. If you’re new to Asian-inspired cooking, don’t worry; this easy Mongolian Beef comes together in under 30 minutes. In my experience, it’s perfect for feeding a family or impressing friends, and the leftovers? Even better the next day. Stick around as I share my tried-and-true recipe that’s sure to become a staple in your kitchen too.
Key Takeaways:
- This Mongolian Beef delivers authentic takeout flavors with tender beef and a sticky sauce that’s better than delivery.
- Ready in just 25 minutes, making it an ideal weeknight meal for busy schedules.
- The balance of sweet and savory notes creates an irresistible taste that’s crunchy and glossy all at once.
- Slice the beef thin and coat well for maximum crispiness and sauce adhesion.
- Store leftovers in the fridge for up to 3 days; reheat gently to keep the texture intact.
Why You’ll Adore This Mongolian Beef
Quick and Effortless Prep: I remember the first time I tried making Mongolian Beef, and it took me by surprise how little time it required – just slice, coat, and stir-fry. You’ll love how this recipe skips complicated steps, letting you focus on the fun part: enjoying the meal. It’s perfect for those evenings when you’re short on time but want something delicious.
Grab This Chef Knife Now - Almost Gone!

- Stays Razor-Sharp: Ice-hardened blade keeps its edge longer than ordinary knives
- Superior Grip Control: Unique finger hole design gives you perfect balance and safety
- Built to Last a Lifetime: Premium stainless steel blade with elegant beech wood handle
- ✓ Finally, a knife that stays sharp and feels comfortable in my hand
- ✓ Professional quality without the premium price tag
- ✓ Makes meal prep faster and more enjoyable
⏰ Only a few items left in stock - order soon
Restaurant-Quality Taste at Home: There’s something magical about the glossy sauce clinging to every piece of beef in this Mongolian Beef; it tastes just like your favorite spot downtown. We always rave about the ginger kick and subtle sweetness that makes each bite addictive. Trust me, once you try it, takeout will be a thing of the past.
Versatile for Any Meal: Whether you’re pairing this Mongolian Beef with rice for dinner or adding it to a stir-fry bowl for lunch, it adapts beautifully to your needs. In my experience, even picky eaters dig in without hesitation thanks to the familiar flavors. It’s a crowd-pleaser that fits seamlessly into your weekly rotation.
Healthier Twist on Classics: By using lean cuts and controlling the oil, this homemade Mongolian Beef feels indulgent yet lighter than the deep-fried versions. You’ll appreciate how easy it is to customize with veggies for extra nutrition. Let’s be honest, who doesn’t want a guilt-free way to satisfy those cravings?
Essential Ingredients for Mongolian Beef
Flank Steak: The star of this dish, flank steak is thinly sliced against the grain to ensure tenderness in your Mongolian Beef. Its lean texture holds up well to quick cooking, absorbing the sauce beautifully without becoming chewy. I always choose a high-quality cut from the butcher for the best results, as it makes all the difference in flavor and mouthfeel. In my experience, freezing it slightly before slicing makes the process a breeze.
Soy Sauce and Brown Sugar: These form the base of the sauce, with soy providing that umami depth and brown sugar adding the signature sticky sweetness to Mongolian Beef. The combination creates a glaze that’s glossy and irresistible, coating every piece evenly. You’ll notice how the balance prevents it from being too salty or overly sweet – it’s just right. Freshly grated ginger and garlic elevate it further, but these two are non-negotiable for authenticity.
Cornstarch: Used to coat the beef, cornstarch is key for that crispy exterior in Mongolian Beef before it meets the sauce. It helps the meat brown quickly and locks in juices during frying. Don’t skip this step; it transforms ordinary beef into something restaurant-worthy. I find mixing it with a bit of water makes a slurry that’s perfect for thickening the sauce too.
Green Onions: These add a fresh, mild onion flavor and vibrant color as a garnish for your finished Mongolian Beef. They cut through the richness of the sauce, providing a nice crunch. Chopped and scattered on top, they make the dish look and taste complete. In my kitchen, I always have them on hand for this recipe and similar stir-fries.
How to Make Mongolian Beef
Prepare the Beef
Start by slicing your flank steak into thin strips, about 1/4-inch thick, against the grain for tenderness in this Mongolian Beef. Pat them dry with paper towels to remove excess moisture, then toss in a bowl with cornstarch, ensuring every piece is lightly coated. This step is crucial for that signature crispiness we’ll achieve later. Heat a wok or large skillet over high heat with a tablespoon of vegetable oil, and once shimmering, add the beef in a single layer to avoid overcrowding. Fry for 2-3 minutes per side until golden and crispy, working in batches if needed. Remove and set aside – the aroma alone will have you excited for what’s next.
Make the Irresistible Sauce
While the beef rests, lower the heat to medium and add minced garlic and ginger to the same pan, stirring for about 30 seconds until fragrant – don’t let it burn, or it’ll turn bitter. Pour in the soy sauce, brown sugar, and a splash of water, whisking vigorously to dissolve the sugar and create a bubbling sauce. Let it simmer for 2 minutes to thicken slightly, then taste and adjust with a bit more sugar if you prefer it sweeter. The glossy sheen and sweet-savory scent will fill your kitchen, reminding you why homemade Mongolian Beef beats takeout every time. This sauce is the heart of the dish, so take your time here.
Combine and Finish
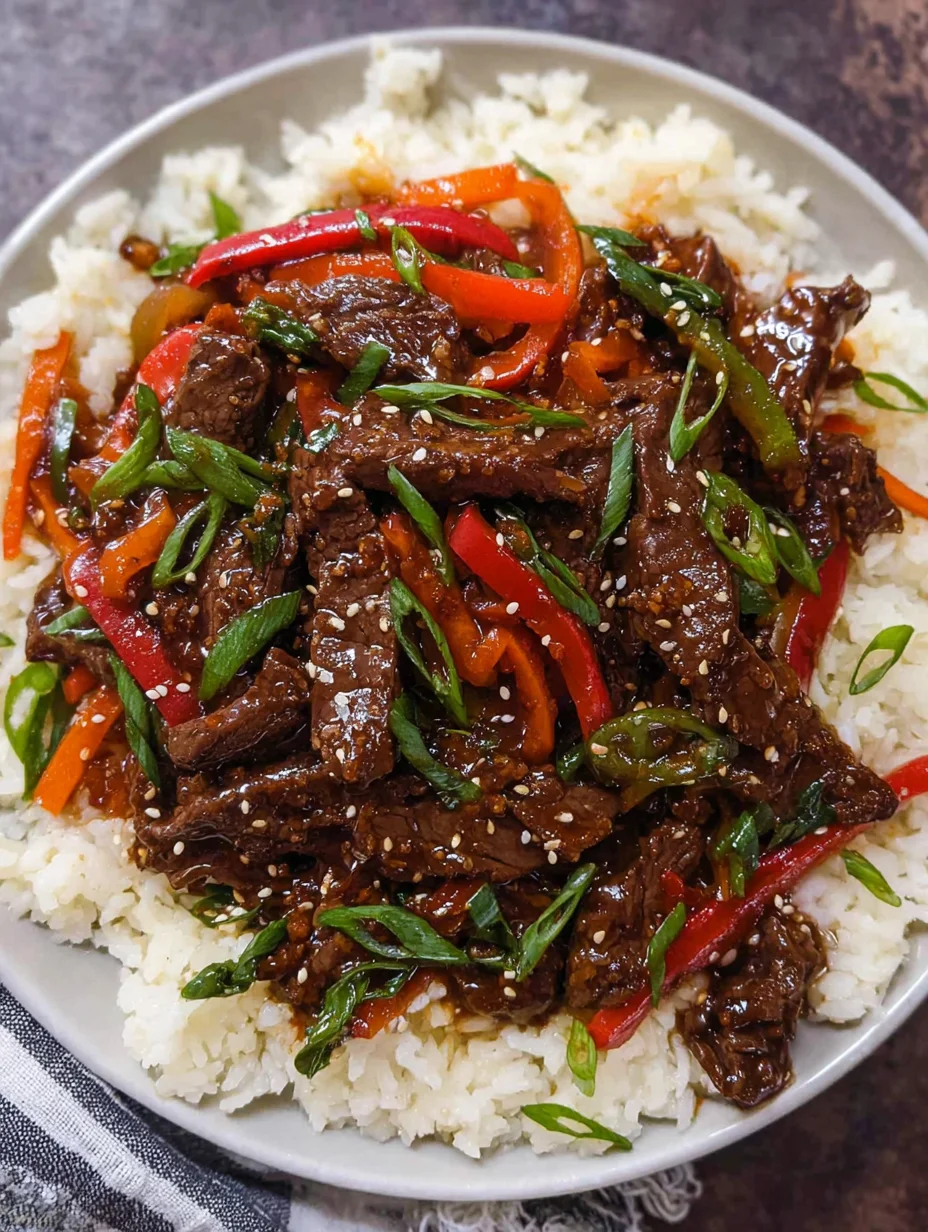
Return the crispy beef to the pan, tossing everything together over medium heat for 1-2 minutes until the meat is fully coated in the warm sauce for your Mongolian Beef. The cornstarch will help the sauce cling perfectly, creating that sticky, delicious texture we all love. Stir in sliced green onions at the last second for freshness, then remove from heat. Serve immediately over steamed rice to soak up every drop – it’s ready when the beef is tender yet still has that slight crunch. In my experience, letting it sit for a minute off the heat intensifies the flavors even more.
Ingredients
- 1 lb flank steak, thinly sliced
- 1/4 cup cornstarch
- 1/4 cup soy sauce
- 1/4 cup brown sugar
- 3 cloves garlic, minced
- 1 tsp fresh ginger, grated
- 2 green onions, sliced
- 2 tbsp vegetable oil
- Salt and pepper to taste
- Optional: 1/4 cup water for sauce
Mongolian Beef Instructions
- Slice flank steak thinly against the grain and coat with cornstarch. Heat oil in a wok over high heat.
- Fry beef in batches until crispy, 2-3 minutes per side. Remove and set aside.
- Sauté garlic and ginger, then add soy sauce, brown sugar, and water. Simmer to thicken.
- Return beef to pan, toss to coat, and add green onions. Serve hot over rice.
Pro Tips for the Best Mongolian Beef
Slice Thin for Tenderness: Cutting the steak thinly ensures it cooks quickly and stays juicy in your Mongolian Beef.
Use High Heat: A hot wok gives that perfect sear without overcooking the meat.
Grab This Kitchen Scale Now — Best Precision Pick!

- Razor-Accurate Every Time: Dual-increment precision down to 0.1g — perfect for baking, meal prep, and portion control with g, oz, ml, and fl'oz modes.
- Smart Removable Bowl Design: Detachable bowl doubles as a protective case for compact storage. Tare function lets you weigh ingredients in any container with zero fuss.
- Built for Everyday Convenience: Auto-zero, tare function, low battery alert, overload indicator, and 2-minute auto-off to extend battery life — all in a sleek stainless steel build.
- ✓ "Perfect for baking — precise, lightweight, and stores easily without wasting counter space"
- ✓ "A game changer! Weighing ingredients is now way more accurate than measuring cups"
- ✓ "Love the 0.1g precision and backlight — best food scale I've owned. Highly recommend!"
⏰ Only a few items left in stock - order soon
Don’t Skip the Cornstarch: It creates the crispy coating that makes this Mongolian Beef stand out.
You Must Know
- Mongolian Beef isn’t actually from Mongolia; it’s an American-Chinese creation inspired by similar flavors.
- High heat is essential for the wok hei, or breath of the wok, that adds smoky depth.
- This recipe is naturally gluten-free if you use tamari instead of soy sauce.
- Pair it with jasmine rice to balance the richness with its subtle floral notes.
How to Store Mongolian Beef
Once cooled, transfer your Mongolian Beef to an airtight container and refrigerate for up to 3 days – the flavors actually meld beautifully overnight. For longer storage, freeze it in portions for up to 2 months, though the texture might soften slightly upon thawing. To reheat, warm gently in a skillet over low heat with a splash of water to revive the sauce, avoiding the microwave which can make it soggy. I’ve found this method keeps the Mongolian Beef tasting fresh and delicious every time.
Customizing Your Mongolian Beef
If beef isn’t your thing, swap it for chicken or tofu to keep the Mongolian Beef spirit alive while suiting dietary needs – just adjust cooking times accordingly. Add veggies like bell peppers or broccoli for extra crunch and nutrition, stirring them in during the sauce step. For a spicier kick, include red pepper flakes. Check out our Chinese Beef and Broccoli recipe for more veggie-packed ideas that pair well with this one.
What to Serve with Mongolian Beef
This Mongolian Beef shines over steamed jasmine rice, which soaks up the glossy sauce perfectly for a complete meal. For a lighter side, try stir-fried bok choy or a simple cucumber salad to cut through the richness. If you’re feeling fancy, egg fried rice adds that authentic touch. Don’t forget a chilled green tea or crisp white wine to complement the Asian flavors – it’s all about balance on the plate.

Mongolian Beef
EASY Mongolian Beef recipe with the BEST sauce! Thinly sliced beef with vegetables in flavor-packed sauce ready in under 30 minutes!
Timing
Recipe Details
Ingredients
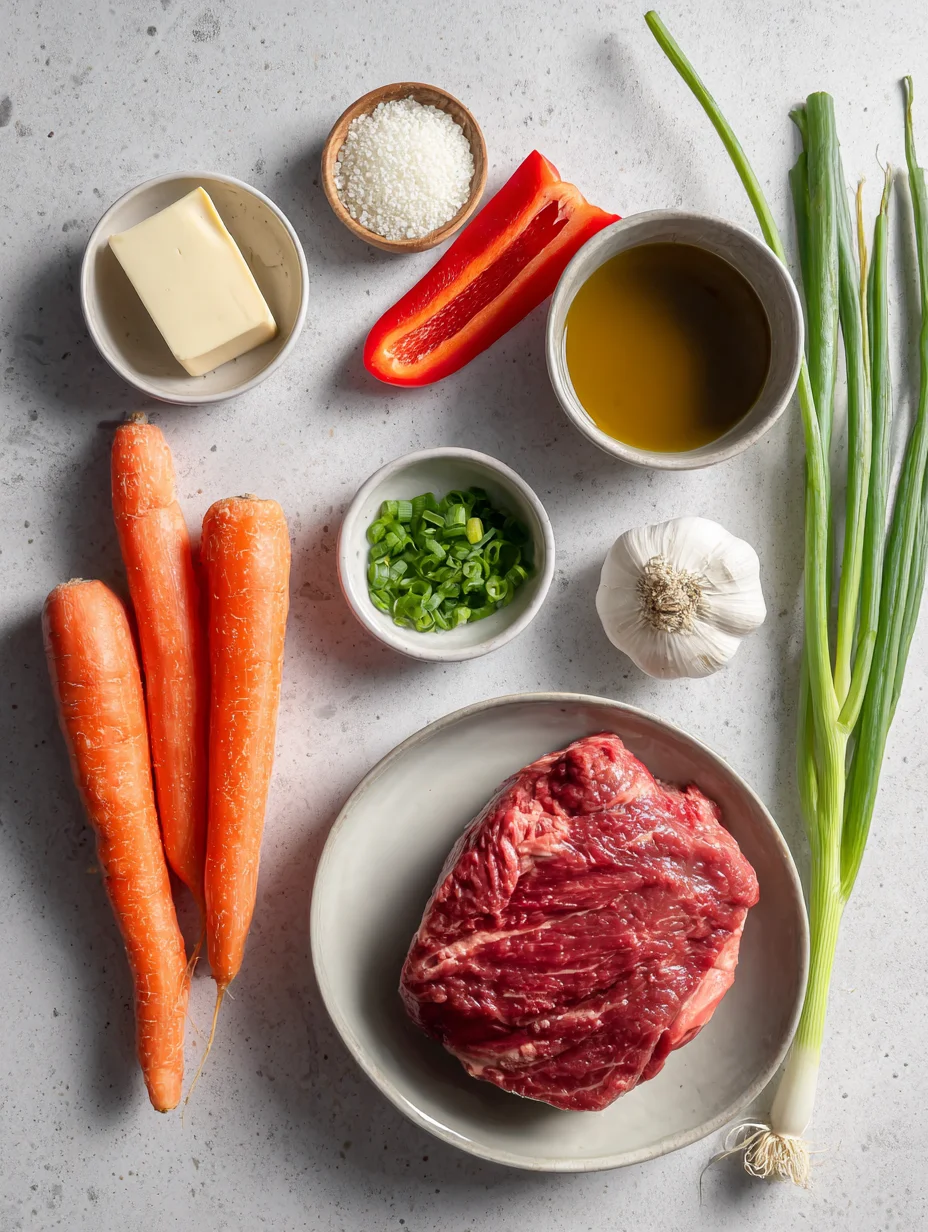
- 01 1 carrot (peeled and julienned)
- 02 1 red bell pepper (sliced into strips)
- 03 1 Tbsp unsalted butter
- 04 2 Tbsp neutral oil (divided*)
- 05 1 lb flank steak (thinly sliced against the grain*)
- 06 1/4 cup corn starch
- 07 1/3 cup green onions (thickly sliced (from 4 stems))
- 08 1 tsp sesame seeds (optional garnish)
- 09 1 tsp fresh ginger (peeled and grated)
- 10 4 garlic cloves (peeled and grated)
- 11 1/3 cup brown sugar (packed)
- 12 1/3 cup water
- 13 1/3 cup low-sodium soy sauce (*)
- 14 1 tsp Sriracha (or added to taste)
Instructions
Place beef slices in a bowl, add cornstarch and stir to completely coat.
In a bowl, combine the ingredients for the sauce and stir until well combined, set aside.
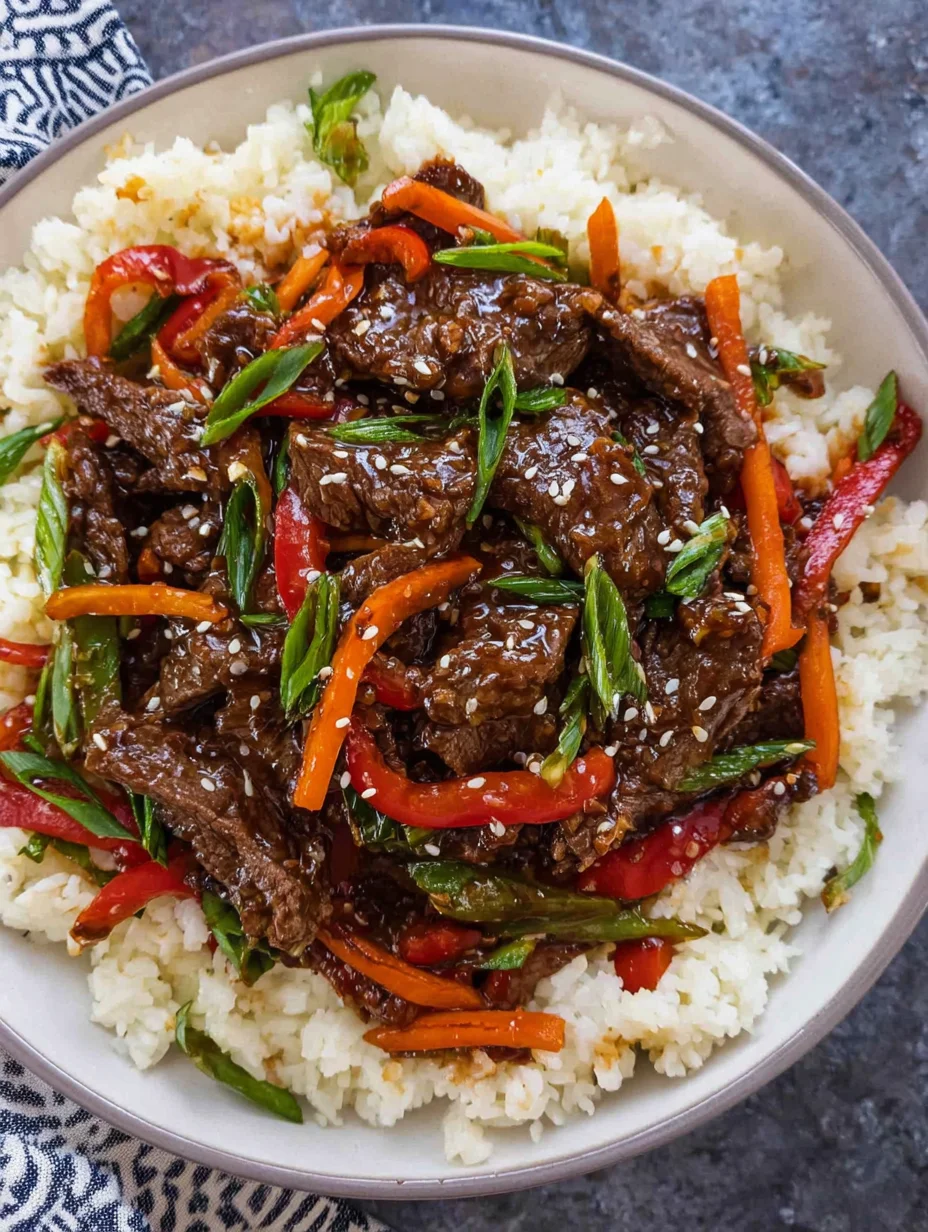
In a large skillet or wok, heat 1 Tbsp oil with 1 Tbsp butter over medium/high heat. Once the skillet is hot, add the carrot and peppers and stir fry until crisp-tender or to your desired tenderness, stirring frequently. Remove the vegetables to a separate plate.
Increase to high heat and add 1 Tbsp oil. Once hot, add the beef and sear for about 2 minutes per side to create a crispy coating. Add more oil if the skillet seems dry. Do not crowd the pan and cook the beef in batches if needed.
Add the vegetables back into the skillet with the green onion. Add the sauce and stir to combine. Turn heat to medium/low and simmer until the sauce thickens, about 3 minutes. Garnish with sesame seeds if desired and serve.
FILED UNDER:
NUTRITION FACTS (PER SERVING)
Nutrition information is calculated using an ingredient database and should be considered an estimate. In cases where multiple ingredient alternatives are given, the first listed is calculated for nutrition. Garnishes and optional ingredients are not included.
Frequently Asked Questions About Mongolian Beef
Can I make Mongolian Beef ahead of time?
Absolutely, you can prepare the components separately and assemble just before serving to maintain crispiness in your Mongolian Beef. Store the cooked beef and sauce in the fridge overnight, then reheat together quickly. This method works great for meal prep without losing that fresh taste.
How long does Mongolian Beef last in the fridge?
Your Mongolian Beef will stay good in the fridge for 3-4 days when stored properly in an airtight container. Beyond that, freeze it to extend freshness up to two months. Always reheat thoroughly to enjoy it safely.
Is Mongolian Beef gluten-free?
It can be – just use tamari or gluten-free soy sauce instead of regular soy, and you’re set for a delicious gluten-free Mongolian Beef. Cornstarch is naturally gluten-free too. Double-check labels for any hidden gluten in your ingredients.
Can I use a different cut of beef for Mongolian Beef?
Yes, skirt or sirloin works well for this Mongolian Beef, but flank remains the best for tenderness. Slice thinly regardless to ensure even cooking and sauce coating. Experiment to find your favorite.
What’s the best oil for frying Mongolian Beef?
Vegetable or peanut oil with high smoke points is ideal for that quick, hot fry in Mongolian Beef. Avocado oil is another healthy option if you prefer. Avoid olive oil, as it can burn at high temps.
How spicy is this Mongolian Beef recipe?
This version of Mongolian Beef is mildly sweet and savory without heat, but add chili oil or flakes to amp it up. It’s customizable for all spice levels. In my experience, a pinch goes a long way.
Can I make Mongolian Beef in an Instant Pot?
While stovetop is traditional, an Instant Pot can work for a set-it-and-forget-it approach to Mongolian Beef – sauté first, then pressure cook briefly. See our Asian Ground Beef Noodles recipe for similar pressure cooker tips. Results are tender but less crispy.
Why is my Mongolian Beef sauce not thickening?
If the sauce isn’t thickening, simmer longer or add a cornstarch slurry while stirring constantly. Ensure the sugar dissolves fully at the start. Patience is key for that perfect glossy Mongolian Beef finish.
Final Thoughts
There’s nothing quite like the satisfaction of plating up a homemade Mongolian Beef that’s crispy, saucy, and full of flavor – it’s the kind of dish that brings everyone to the table with smiles. Whether you’re a busy parent or just love good food, this recipe proves you don’t need a fancy kitchen to create magic. Give it a try tonight; I promise you’ll be hooked and coming back for more. Share your twists in the comments – I’d love to hear how your Mongolian Beef turns out!